If you want to drive a commercial vehicle, getting your air brake endorsement isn't just a suggestion—it's a must. The official test can feel pretty daunting, but there's no better way to get ready than with a solid air brakes practice exam. It’s the best tool for turning textbook knowledge into real confidence so you can ace the test on your first try.
Why This Practice Exam Is Your Key to Passing
Passing the CDL air brakes test is about more than just cramming facts. It’s about proving you have the know-how to safely handle a vehicle with a powerful and complex braking system. Anyone who plans to operate a commercial truck or bus with air brakes needs this endorsement, period. And honestly, just reading the manual cover-to-cover rarely cuts it when you’re faced with the specific scenarios and technical questions on the real exam.
This is where a good practice test makes all the difference. It puts you in the hot seat, simulating the pressure and format of the actual test. This way, you can find and fix any weak spots in your knowledge before they become a problem on the big day.
The Foundation of Modern Vehicle Safety
It helps to know why this stuff is so important. Air brake technology isn't new; it goes all the way back to 1869 when George Westinghouse patented his air brake for railways. Before that, stopping a train was a dangerous, manual job where brakemen had to run along the tops of moving cars. Westinghouse's invention was a game-changer, allowing an engineer to brake all cars at once—a safety innovation that paved the way for the systems we rely on in heavy trucks today.
By mastering the principles of air brake operation, you are not just preparing for a test—you are becoming a steward of a critical safety technology that has protected lives for over 150 years.
This guide is your roadmap. We’ll walk you through everything, from how the system works to the critical pre-trip inspection, giving you a study plan that builds the kind of confidence you can only get from hands-on practice.
What This Guide Covers
We're here to give you a clear, straightforward path to passing the test. No dense jargon, just the essentials broken down into simple, easy-to-digest pieces.
Here’s what you'll find inside:
- Core Concepts Explained: We'll break down how air brake systems actually work, using simple analogies to make it click.
- Inspection Mastery: You'll get a step-by-step walkthrough of the pre-trip inspection, which is a huge part of the exam.
- Realistic Practice: A full-length practice exam, complete with detailed answer explanations, lets you test your knowledge.
- Common Pitfall Avoidance: We’ll point out the common mistakes that trip people up so you can steer clear of them.
Once you have your air brake endorsement, you might want to broaden your qualifications even further. Taking steps to remove vehicle limitations is a smart career move. For more information, you can check out our guide on the e-restriction removal course.
Understanding How Your Air Brake System Works
Before you even think about tackling an air brakes practice exam, you need a solid grasp of the machine itself. The best way I've found to explain it is to think of the air brake system like the human body. It’s a whole network where every single part has a job, and they all have to work together perfectly to keep a massive vehicle safely under control.
Let's start with the heart of the system: the air compressor. Its one and only job is to pump air—the lifeblood of your brakes—throughout the truck. This compressor is usually driven by the engine, constantly working to build up and maintain air pressure. Just like your heart pumps blood, the compressor pushes air into the storage tanks.
Those air storage tanks are basically the system's lungs. They hold all that compressed air until you actually need it to stop the truck. You'll find several tanks on a typical rig, which is a safety feature ensuring you always have a reserve of pressurized air ready to go, even if the compressor takes a break.
The Brains and Muscles of the System
Now, once all that air is stored, something needs to control it. That’s where the air compressor governor comes in—it's the brains of the operation. The governor tells the compressor when to start pumping and when to take a rest, keeping the air pressure in a safe range, which is typically between 100 and 125 PSI. When the pressure drops, the governor signals the compressor to "cut-in" and get back to work. Once the tanks are full, it tells it to "cut-out," preventing the system from getting over-pressurized.
When you step on the brake pedal, you're the one giving the command to release that stored air. The brake pedal (you'll also hear it called the foot valve or treadle valve) is the trigger. The harder you press down, the more air pressure you send out to the brakes, giving you more stopping power. It’s a surprisingly sensitive setup that gives you a lot of control.
That burst of air travels through a network of lines and valves to the brake chambers located at each wheel. The brake chamber is where the real work gets done; it’s what turns the energy from that compressed air into raw, mechanical force.
The core principle is simple but powerful: air pressure pushes a rod out of the brake chamber, which then moves the slack adjuster. This is the critical link that translates a simple push of air into the powerful force needed to stop a multi-ton vehicle.
The slack adjuster and brake camshaft then work together like a classic lever and fulcrum. The slack adjuster cranks the brake camshaft around, which forces the brake shoes to press against the inside of the brake drum. That friction is what ultimately slows the wheel down and brings you to a stop. Every single piece in this chain reaction has to be in perfect working order.
To help you keep track of all these moving parts, here's a quick breakdown of what they do and why they matter for your test.
Air Brake System Key Components and Functions
| Component Name | Primary Function | What to Know for the Exam |
|---|---|---|
| Air Compressor | Pumps air into the storage tanks. | How it's driven (engine), its role in building pressure. |
| Air Governor | Controls when the compressor starts and stops. | The cut-in (100 PSI) and cut-out (125 PSI) pressure settings. |
| Air Storage Tanks | Store compressed air for the brake system. | The purpose of multiple tanks and the function of the drain valve. |
| Brake Pedal | Allows the driver to apply air pressure to the brakes. | How pressing harder increases braking force. |
| Brake Chambers | Convert air pressure into mechanical force. | Its function in pushing the slack adjuster. |
| Slack Adjuster | Forms the link between the brake chamber and the S-cam. | How to check for proper adjustment (no more than 1 inch of play). |
| Brake Drum & Shoes | Create friction to slow and stop the wheel. | The basic principle of how friction stops the vehicle. |
Having a mental map of how these components work together is a game-changer for the exam.
Why This Matters for Your Exam
Understanding this flow—from the compressor to the tanks and finally to the brake chambers—is absolutely essential. A lot of questions on the air brakes practice exam aren't just about memorizing part names. They're designed to test if you know how these parts interact with each other. For example, you’ll get questions asking what happens if the governor malfunctions or why the low-air warning alarm comes on.
When you truly understand how the system works, you can reason your way through those tricky scenario questions instead of just trying to recall a memorized fact. This foundational knowledge isn't just about passing the test; it's also a major part of the general knowledge you'll need for your CDL. For a closer look at what that broader exam covers, check out our guide on the general knowledge test. Knowing the 'why' behind each component is what separates someone who just passed a test from a driver who is truly safe and competent out on the road.
Mastering the Pre-Trip Air Brake Inspection
Let's be honest: the pre-trip inspection is often the most intimidating part of the CDL test. It's also the single most important section on your written air brakes practice exam. This isn't just about memorizing a checklist; it's a hands-on sequence where you prove you understand how to keep a multi-ton vehicle safe before the wheels even start rolling.
Think of it as being a detective. You’re not just going through the motions—you’re actively hunting for any sign of wear, damage, or a potential leak that could cause a catastrophic failure on the road. Get this part down, and you're well on your way.
This diagram shows you the basic path air takes, starting from the compressor, moving to the storage tanks, and finally getting to the brakes themselves.
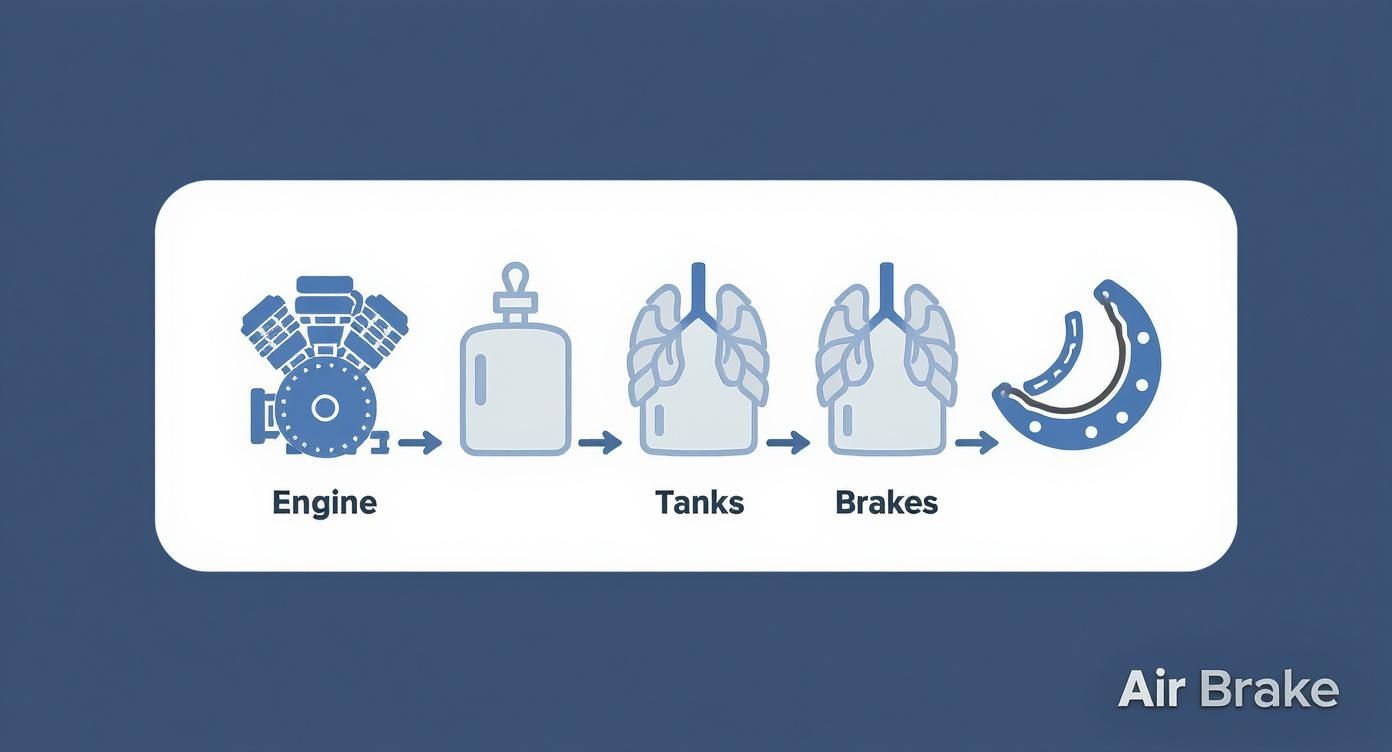
If you can picture this flow in your head, the inspection steps suddenly make a lot more sense. You're just testing each part of that journey.
Step 1: Air Pressure Buildup Test
First things first, you have to make sure the system can actually make air. This initial check verifies that the air compressor and governor—the heart and brain of your air supply—are working together properly.
With the engine running, you’ll keep your eyes glued to the air pressure gauge. You’re looking for the pressure to climb from 85 PSI to 100 PSI within 45 seconds on a dual air system. If it's building pressure that quickly, you know the compressor is healthy.
Next, just let it keep building until the governor "cuts out," which is just a fancy way of saying it stops the compressor. You should hear a distinct hiss of air as it cuts out somewhere at or before 125 PSI. A slow build-up or a failure to cut out are major red flags.
Step 2: Applied and Static Leak Tests
Okay, so the system can make air. But can it hold it? That's what this next part is all about. You'll shut the engine off but leave the key in the "on" position so the gauges stay lit up.
Release the parking brake so air can move throughout the entire system. Wait for the needle on the gauge to settle after that initial drop, and now you're ready for the static leak test.
The rule here is simple but absolutely critical: With your foot off the brake, you can't lose more than 2 PSI in one minute for a straight truck or 3 PSI for a combination vehicle.
Now, for the applied leak test. This mimics what happens when you're holding the truck still with the brakes at a stoplight. Press the brake pedal down firmly and hold it for one full minute. You shouldn't lose more than 3 PSI for a straight truck or 4 PSI for a combination vehicle. Any more than that, and you've got a leak that needs to be found and fixed. For a full rundown of every part to check, our CDL pre-trip inspection guide has a complete checklist.
Step 3: Low Air Warning System Check
This test is all about making sure your safety net is working. If you ever start losing air pressure on the road, you need the truck to scream at you before it's too late. This is one of the most vital safety features on the vehicle.
To check it, you’ll start "fanning" the brake pedal—just pumping it on and off to bleed air out of the tanks on purpose. While you do this, watch that air gauge like a hawk and listen.
At or above 55 PSI, your low-pressure warning light and buzzer must come on. That alarm is your non-negotiable signal to get that truck pulled over safely before the brakes engage on their own.
Step 4: Spring Brake Engagement Test
This is the grand finale of your air brake check. You're making sure the ultimate fail-safe—the spring brakes—will do their job and lock up the wheels if you lose all your air.
Keep fanning the brake pedal down after the low-air warning has already started buzzing. As the pressure continues to drop, something important is about to happen.
Sometime between 20 and 45 PSI, the parking brake valve on your dash should pop out on its own. That pop is the sound of the powerful spring brakes automatically engaging, bringing the vehicle to a secure stop. It's the system's last line of defense.
Nailing this four-part sequence shows the examiner you don't just know the rules; you understand how to keep yourself and everyone else on the road safe.
Simulating Test Day With a Practice Exam
Knowing the material is one thing, but can you recall it under pressure? That’s a completely different skill, and it’s where a good air brakes practice exam becomes your most valuable training tool. This isn't just about quizzing yourself; it's about simulating the real deal to build the confidence and mental focus you’ll need when it actually counts.
When you work through questions that mimic the format and difficulty of the official test, you get a true measure of where you stand. You'll quickly see which topics are giving you trouble, whether it's memorizing specific PSI numbers for your pre-trip inspection or knowing how to react to a system failure on the road.
This process takes abstract ideas from the CDL manual and turns them into real problems you have to solve. And that’s the best way to make the information stick.
Why Practice Under Pressure?
Think of a practice exam as a full dress rehearsal. It gets you comfortable with the question styles, from simple definitions to tricky "what would you do if…" scenarios. The more familiar you are, the less anxiety you'll feel on test day, freeing up your mind to just focus on the questions in front of you.
This isn’t just about passing a test; it’s about safety. The Federal Motor Carrier Safety Administration (FMCSA) mandates this knowledge test for a reason. A poor understanding of air brake systems is a factor in roughly 20-30% of all CDL test failures.
A realistic practice exam doesn't just measure what you know; it trains you how to access that knowledge quickly and accurately under timed conditions. This skill is just as important as the information itself.
Considering that an estimated 70% of heavy trucks use air brakes, this endorsement is a cornerstone of commercial driver safety. The proof is in the numbers: drivers who use standardized practice exams have a 15-20% higher pass rate on their official test. That's a huge advantage that directly contributes to safer roads for everyone.
Taking Your First Practice Exam
The best way to begin is to just jump in. Your first attempt isn't about getting a perfect score—it’s about finding your baseline. You have to know where you're strong and where you're weak before you can make a solid study plan.
Treat it like the real thing. Find a quiet spot, set a timer, and go through it without peeking at your notes.
Once you finish, it's time to dig into the results. Don't just glance at the ones you got wrong. Ask yourself why you got them wrong.
- Misunderstood a Concept? Did you get the role of spring brakes and service brakes mixed up?
- Forgot a Specific Number? Did you confuse the PSI for the low-air warning with the PSI for spring brake engagement?
- Misread the Question? Did you miss a key word like "not" or "except"?
Finding these patterns is what turns generic studying into targeted, efficient practice. You'll know exactly which pages of the manual to revisit.
The Power of Detailed Explanations
Just seeing the correct answer isn't enough to learn. The best practice tests give you a detailed explanation for every single question, and this is where the real lightbulb moments happen. A good explanation will tell you why the right answer is right and why the other choices are wrong.
This helps you fix misunderstandings at the source. For instance, if you missed a question on brake fade, a quality explanation won’t just define the term. It will connect it to a real-world scenario, like overusing your service brakes on a long, steep downgrade.
This deeper understanding is what separates someone who just passed the test from a driver who truly masters the material. When you’re ready to see how you stack up, start with a comprehensive Air Brakes Test with full explanations. The more you practice, the more these concepts become second nature.
By repeatedly putting yourself in a test-day scenario, you're building more than just knowledge—you're building the confidence to walk into that testing center knowing you're prepared. You’ll know what to expect, how to pace yourself, and how to tackle even the toughest questions. This preparation is the final step in turning all that hard work into a passing score and the keys to a new career.
Don't Fall for These Common Test Day Traps
Knowing the study material is one thing, but knowing where other people mess up? That’s your ace in the hole. Even drivers who’ve studied hard can get tripped up by a few notoriously tricky topics on the air brakes exam. Let's walk through these common pitfalls so you can turn them into easy points on test day.
A lot of test-takers make simple mistakes, not because they’re unprepared, but because they misunderstood a tiny—but critical—detail. These aren't obscure facts, either. They're fundamental concepts that are just plain easy to mix up when you're under pressure.
The key is to go beyond just memorizing the facts. You need to understand the why behind the rules. When you get the logic, it's much harder for a cleverly worded question to trick you.
Getting the Numbers Wrong: PSI and Time Limits
One of the biggest areas where people lose points is with the specific numbers for the pre-trip inspection tests. It is incredibly easy to mix up the PSI loss limits for the static versus the applied leak tests, or to confuse the time it should take for air pressure to build up.
For example, you might remember that a leak test is timed for one minute, but completely blank on the exact PSI drop allowed. The test designers know this, and they'll give you answer choices that are frustratingly close to each other, just to catch you out.
The difference between a 3 PSI and a 4 PSI allowable drop might seem tiny, but on the exam, it's the difference between passing and failing. When it comes to safety numbers, precision is everything.
My advice? Make flashcards just for these numbers. Drill them over and over until you can rattle off the limits for straight trucks and combination vehicles without even thinking about it. That kind of practice builds the instant recall you need when the clock is ticking.
Confusing Spring Brakes and Service Brakes
Another major hurdle is wrapping your head around the different jobs of the spring brakes and the service brakes. They're both part of the same system, but they work in completely different ways, and you can bet the exam will test you on that difference.
A classic mistake is thinking spring brakes are for regular, everyday stopping. They aren't. Your service brakes are the ones you use when you hit the brake pedal while driving; they use air pressure to apply the brakes.
Spring brakes are your parking and emergency brakes. They work on a totally opposite principle: powerful springs are what physically hold the brakes on, and it actually takes air pressure to release them. This is a critical fail-safe. If you suffer a catastrophic air loss, those springs automatically engage and bring the truck to a stop.
This is a concept so important that we need to break it down. Many drivers fail the air brake test because they get a question about this wrong.
Common Air Brake Test Failures and Prevention Tips
| Common Mistake | Why It's Wrong | How to Get It Right |
|---|---|---|
| Stating spring brakes are for normal stopping. | Service brakes (foot pedal) handle normal stops. Spring brakes are for parking and emergencies. | Remember: Service brakes stop, Spring brakes hold. |
| Mixing up PSI loss limits for different tests. | The applied test (brake pedal pushed) allows for more PSI loss than the static test (brakes released). | Memorize: 3 PSI loss for a straight truck static test, 4 PSI for an applied test in one minute. |
| Forgetting the "low air" warning device range. | The warning must activate before pressure drops too low to stop the vehicle safely. | The low air warning (light and buzzer) must come on at or above 55 PSI. |
| Not knowing when spring brakes will automatically engage. | This is a critical safety feature. If you lose too much air, the truck must be able to stop itself. | The parking brake valve should pop out (engaging the spring brakes) between 20-45 PSI. |
Getting these concepts straight is non-negotiable. If you can confidently explain why it takes air to release the spring brakes, you'll be in great shape for any scenario-based questions the exam throws at you. Master these common points of confusion, and you'll walk into that test room ready for anything.
Air Brake Exam Questions and Answers
After digging into the mechanics of the system, walking through a pre-trip inspection, and highlighting common mistakes, a few questions always seem to pop up. Think of this last section as your final huddle before test day—a place to get straight, simple answers to the most common things drivers ask about the official air brakes exam.
Getting these last few details sorted out can be a real confidence booster. Let’s clear up any lingering confusion so you can walk into that testing center knowing you’re ready.
How Many Questions Are on the Official CDL Air Brakes Test?
This is easily the question I hear most often, and the answer can vary a bit from state to state. Generally, you can expect the official air brakes knowledge test to have between 25 and 35 multiple-choice questions. This is exactly why drilling full-length practice tests is so critical—it gets you used to the pace and the sheer volume of information you need to recall.
To get the endorsement, you’ll almost always need to score at least 80%. The bar is set high for a reason; safe braking is non-negotiable in this industry.
What Causes an Automatic Failure on the Air Brakes Test?
When you get to the hands-on skills part of your CDL exam, some mistakes are so serious they’ll end your test on the spot. These are the red flags that tell an examiner you don't have a firm grasp of the fundamental safety procedures.
Here are the big ones that will get you an automatic fail:
- Botching the Leak-Down Tests: You absolutely must know how to perform both the static and applied air leak tests and be able to state the maximum PSI loss allowed for each.
- Failing to Explain the Low-Pressure Warning: If you can't identify that the low-air warning alarm and light should activate at or above 55 PSI, that's a major safety gap.
- Not Knowing the Spring Brake Pop-Out: You have to demonstrate how to test the automatic engagement of your spring brakes and know the PSI range (between 20 and 45 PSI) where they should pop out.
Basically, any action that could compromise the safety of the vehicle or shows you're not ready to manage the system correctly can be grounds for immediate failure.
How Long Should I Study for the Air Brakes Exam?
Everybody learns differently, but a good rule of thumb is to set aside one to two weeks to focus specifically on the air brakes endorsement. That time should be filled with active learning, not just flipping through the manual.
A solid study plan is about more than just memorizing facts. It should be a mix of reading the CDL manual, taking practice exams over and over again, and, if you can, getting your hands on a real truck to see how the system works. The real goal is to truly understand it.
This kind of focused effort makes sure you can handle the scenario-based questions that are guaranteed to be on the test. If you're building your own study guides, a quiz AI generator can be a handy tool for creating fresh questions to test yourself from different angles.
What Is the Minimum PSI for Safe Operation?
Knowing your numbers is crucial, and this is one of the most important ones. For any dual air brake system, you should not operate the truck if the air pressure in either system drops below 100 PSI.
That 100 PSI is your safety net. It ensures you have enough air in the tanks to make multiple safe stops in a row if you had to. Driving below that pressure is a huge risk, as you might not have the stopping power you need in an emergency. It's a number you must have memorized for the test and for every single pre-trip inspection you'll do in your career. A great way to lock these numbers in is to work through a tough air brakes practice exam with answers and explanations. Repetition is key.
At Patriot CDL, we're here to get you on the road with the skills and confidence to build a great career. Our expert-led training covers everything you need to pass your exams and succeed from day one. Ready to get started? Visit us at https://patriotcdl.com to learn more about our courses.