If you want to operate most heavy commercial vehicles, passing the air brakes CDL endorsement isn't just a suggestion—it's a must. This knowledge is what stands between you and safely handling an 80,000-pound rig, making it one of the most important hurdles to clear on your way to becoming a professional driver.
Why Air Brakes Are a Big Deal for Your CDL

Ever wondered why a semi-truck doesn't just use bigger versions of the brakes in your car? It all comes down to simple physics. Your car relies on a hydraulic system, which uses fluid to multiply the force from your foot and stop a couple of tons. It works great for a sedan, but it's completely outmatched by the sheer weight of a fully loaded commercial truck.
A tractor-trailer needs an incredible amount of force to come to a safe stop. That's where air brakes step in. Instead of fluid, these systems harness the power of highly compressed air—a force strong enough to control the immense momentum of a heavy-duty truck. Getting your head around this fundamental difference is the first real step to mastering the air brakes CDL endorsement.
The Power of Compressed Air
Think about it this way: trying to stop a loaded big rig with car brakes would be like trying to stop a freight train by leaning on it. You just don't have enough muscle. The air brake system acts as a massive force multiplier, turning a simple push on the brake pedal into enormous stopping power at each wheel. This level of reliability isn't just for safety; it's required by federal law.
The industry itself shows just how critical these systems are. The global air brake system market was valued at $3.1 billion in 2023 and is only expected to grow. That's because every new heavy commercial truck and bus that rolls off the line depends on air brakes as the standard for dependable stopping power.
Why It Matters for Your CDL Test
You don't just need to know about air brakes; you need to master them. It's a huge part of your CDL exam, and you'll be tested on it in two key ways:
- Written Knowledge: You'll have to prove you understand the system inside and out, from the major components to how they all work together.
- Skills Test: You'll be required to perform a detailed, multi-step air brake inspection to show you can spot a problem before you even start the engine.
Failing the air brake portion of the pre-trip inspection is an automatic failure of the entire CDL skills test. That's how seriously the examiners take this.
A rock-solid understanding doesn't just get you past the test; it gives you the real-world skills to operate safely for your entire career. Getting a firm grip on all the CDL requirements is your ticket to a long and successful future on the road. This guide will walk you through it all, from the basic theory to the hands-on inspection, breaking down these complex topics into something you can really understand.
How Each Part of the Air Brake System Works
To really get your air brakes endorsement, you have to know this system like the back of your hand. It's not just about memorizing parts for the test; it's about understanding how they all work together to bring an 80,000-pound rig to a safe, controlled stop. Think of it as a perfectly timed chain reaction, with every component doing its part in a split second—all powered by simple compressed air.
This isn't just trivia, either. It’s the core of commercial vehicle safety. There’s a reason why safety inspections are so focused on air brakes and why the market is set to grow from $10 billion in 2025 to an estimated $14 billion by 2033. Heavy trucks rely on the immense stopping power that only air can provide. For a deeper dive, you can read an analysis of the commercial air brake market growth to see just how critical these systems are.
Let’s walk through the key players and see how they get the job done.
The Powerhouse and The Brain
Everything starts with two components working in perfect harmony: the air compressor and the governor.
The Air Compressor: This is the heart of the whole operation. It’s usually driven by the engine, and its only job is to suck in outside air and pump it into the storage tanks. It's constantly on standby, ready to build pressure.
The Governor: If the compressor is the heart, the governor is the brain. It's a simple but brilliant device that tells the compressor when to work and when to rest. When the air pressure in the tanks hits the "cut-out" point (usually around 125 psi), the governor tells the compressor to stop pumping. Once the pressure drops to the "cut-in" level (around 100 psi), it signals the compressor to kick back on.
This on-off cycle is what keeps your system charged and ready without blowing a line. It’s a self-regulating process you’ll keep a close eye on with your dashboard gauges.
A Quick Look at Air Brake System Components
To get a clearer picture, let's break down the main parts you'll find in any commercial air brake system. Knowing what each one does—and what the CDL test expects you to know—is crucial for both safety and passing your exam.
| Component | What It Does | Key CDL Knowledge |
|---|---|---|
| Air Compressor | Pumps air into the storage tanks. | Usually engine-driven; you'll need to know the cut-in/cut-out pressures. |
| Governor | Controls the compressor, telling it when to turn on and off. | You must know the standard psi ranges (100-125 psi) for operation. |
| Air Tanks (Reservoirs) | Store the compressed air. | You must know how to drain them daily to remove water and oil. |
| Treadle Valve (Foot Pedal) | Releases air from the tanks to apply the brakes. | Understand that pressing harder releases more air for stronger braking. |
| Brake Chambers | Convert air pressure into mechanical force at the wheels. | Be aware that a leak here can drain your system quickly. |
| Pushrod & Slack Adjuster | Transfer force from the brake chamber to the s-cam. | You must know how to check for proper adjustment (no more than 1 inch of play). |
| S-Cam, Shoes, & Drum | The final components that create friction to stop the wheel. | The s-cam forces the brake shoes against the drum. |
Understanding how these parts interact is what separates a good driver from a great one. It’s the difference between just pressing a pedal and truly being in control of your vehicle.
Storing and Directing the Power
Once the compressor has done its job, that pressurized air needs a place to live until you need it. That's where the air tanks and the foot valve come in.
The air storage tanks, or reservoirs, are like the lungs of the system. They hold a massive volume of compressed air, ready to be deployed. A typical rig has several tanks to ensure you have enough air for multiple stops, even if the engine shuts off. Each tank has a drain valve at the bottom—something you'll get very familiar with. Draining them daily is non-negotiable, as moisture and oil can build up and cause serious problems, especially in freezing weather.
When you step on the brake pedal—which is officially called the treadle valve or foot valve—you aren't physically pushing on the brakes. You're simply opening a valve. The more you press down, the wider that valve opens, letting a controlled blast of air rush from the tanks toward the wheels. Your foot is just the trigger for a much more powerful force.
The Final Action at the Wheels
The journey of compressed air ends at the wheels, where the brute force of stopping actually happens. This is where air pressure becomes mechanical action.
The air rushes into the brake chambers at each wheel. Inside each chamber, it pushes against a tough, flexible rubber disc called a diaphragm. This forces a steel rod, the pushrod, to move out of the chamber.
This is where the magic happens. A little bit of air pressure on that diaphragm creates a huge amount of mechanical force at the end of the pushrod.
That pushrod is connected to a lever called a slack adjuster, which then rotates the s-cam. Because of its "S" shape, as the cam turns, it forces the heavy-duty brake shoes apart and presses them against the inside of the brake drum. That friction is what stops the truck.
When you take your foot off the pedal, the air pressure is released, and heavy springs instantly pull the brake shoes back from the drum. The wheels are free to roll again. This whole sequence happens at every wheel almost instantly, giving you incredible and balanced stopping power.
Mastering the Seven-Step Pre-Trip Air Brake Test
Alright, you've got the theory down, but now it's time to get your hands dirty. The seven-step pre-trip air brake test is, without a doubt, the most critical hands-on skill you'll need to nail for your CDL exam. Think of it less as a test and more as a conversation with your truck, where you're asking it to prove it's safe before you ever roll out.
CDL examiners watch this part like a hawk. Why? Because it shows them you really understand the air brake system, not just what's in the book. Getting this right tells them you're a professional who puts safety first. Let's walk through it, step-by-step, so you know exactly what to do and, more importantly, why you're doing it.
This simple diagram shows how it all works: the compressor makes the air, the tanks store it, and the brakes use it to stop you.
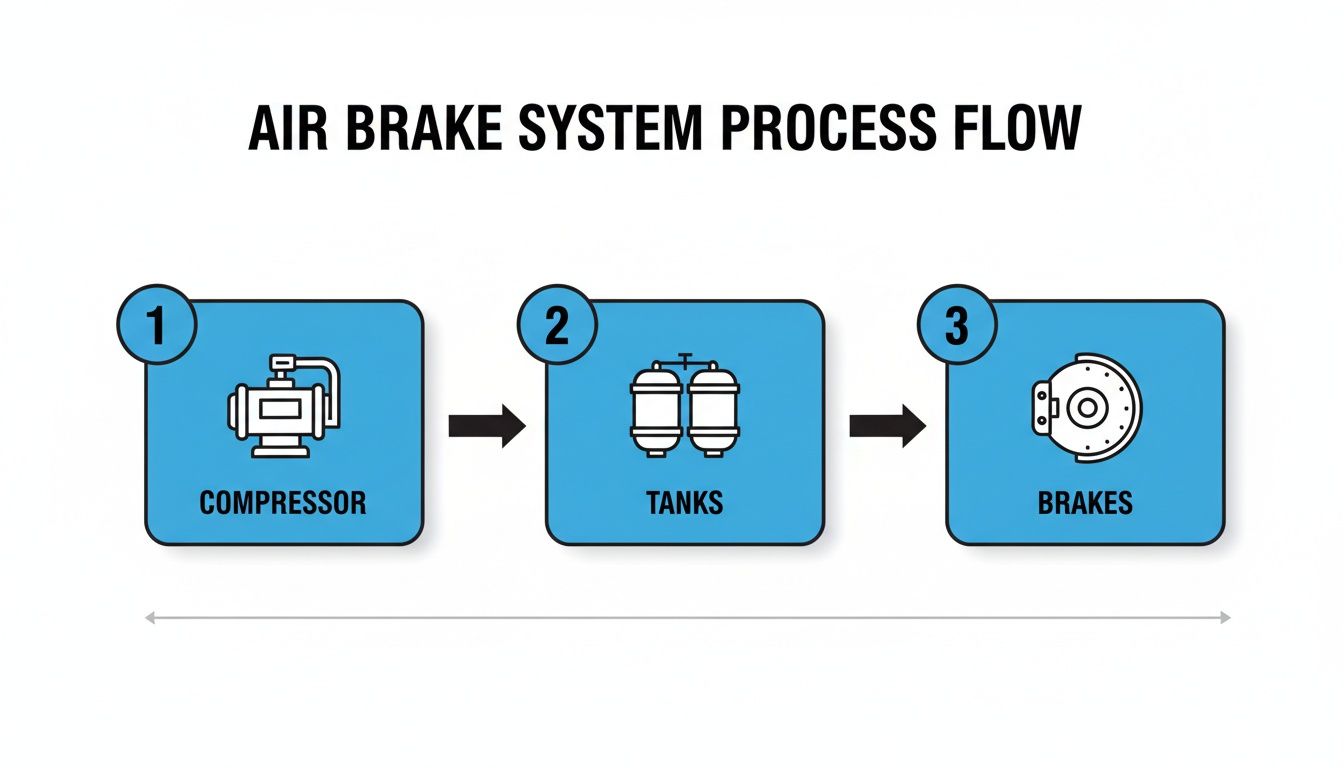
It’s a chain of events. If any one of those links—making, storing, or using the air—is weak, your ability to stop safely is compromised.
Step 1: Build Air Pressure to Governor Cut-Out
First thing's first: make sure your wheels are chocked and your spring brakes are set. Fire up the engine and let the air compressor do its thing. You're watching that air pressure gauge climb steadily.
Your ears are part of this test, too. Listen for that distinct "pssshh" sound of the governor cutting off the compressor. That should happen right around 120-125 PSI. When it does, announce the pressure to the examiner. This confirms your system isn't over-pressurizing.
Step 2: Test the Static Air Leak Rate
Now, kill the engine but turn the key to the "on" position so your gauges stay live. Push in both the tractor and trailer brake knobs to release the spring brakes. Let the needles on the gauges settle for a second, then start a timer for one full minute.
In that minute, you should lose no more than 2 PSI on a straight truck or 3 PSI on a combination rig. Call out the starting and ending pressure. This check tells you if you have any quiet leaks bleeding pressure while the truck is just sitting there.
Step 3: Test the Applied Air Leak Rate
Next, we'll check for leaks with the brakes actually working. Press the service brake pedal down firmly and hold it for another full minute. Keep your eyes glued to that air gauge.
You'll see an initial drop in pressure when you first hit the pedal, which is normal. After that, the system shouldn't lose more than 3 PSI for a straight truck or 4 PSI for a combination vehicle. This test is huge because it mimics holding the truck on a hill with your foot on the brake.
Step 4: Test the Low Air Warning System
Okay, keep the key on and the engine off. It's time to start "fanning" the brake pedal—pumping it on and off to bleed air out of the tanks.
As the pressure drops, you're waiting for the low-air warning light and buzzer to kick on. This has to happen before the pressure gets below 60 PSI. The moment it does, announce the exact PSI to your examiner. This is your truck's early warning system.
Step 5: Test the Spring Brake Activation
Keep fanning that brake pedal. The low-air warnings are already on, and now you're testing the system's last line of defense. As the pressure continues to plummet, the spring brakes should engage automatically.
You'll know it happened when the yellow and red knobs on your dash pop out on their own. This must happen somewhere between 20 and 45 PSI. This proves that if you ever had a catastrophic air loss, the emergency brakes would bring you to a stop.
Step 6: Rebuild Air Pressure to Max
Time to prove the system can recover. Start the engine and let the compressor build the pressure back up. The examiner will be watching the clock on two key benchmarks here.
- The system must build from 85 to 100 PSI in 45 seconds or less.
- From there, it should continue building all the way up to the governor cut-out (around 120-125 PSI).
This test shows your compressor is healthy and can recharge the system quickly after heavy braking.
Step 7: Test the Service Brakes
The final check is the one that really counts. With the system fully aired up, release the parking brakes, shift into a low gear, and pull forward slowly—no more than 5 MPH.
Now, apply the service brakes firmly. The truck should stop smoothly and, most importantly, shouldn't pull to one side or the other. This is the real-world confirmation that everything you just tested is actually working together to stop the vehicle. A perfect https://patriotcdl.com/pre-trip-inspection/ is a skill every professional driver has mastered.
Don't think of this seven-step process as just something you do for the CDL test. It's a non-negotiable, life-saving habit. According to the Commercial Vehicle Safety Alliance (CVSA) International Roadcheck, brake system defects are the number one reason trucks are placed out of service, accounting for a whopping 25% of all violations. That statistic alone tells you everything you need to know about why this check is so important on every single trip. For additional safety resources, this forklift training video guide offers insights into vehicle inspection that apply across heavy machinery.
What to Do When Your Air Brakes Fail
Knowing your air brake system inside and out is one thing, but knowing how to react when it all goes wrong is another. The road is unpredictable. Understanding what to do if your brakes fail isn't just a test question—it's a critical survival skill for any professional driver.
The first signs of trouble are rarely dramatic. They usually start small, with subtle warnings that a well-trained driver learns to recognize. Maybe the brake response feels sluggish, the pressure drops a little too fast, or you catch the faint smell of hot brakes. The key is to act on these clues right away, before a small problem becomes a full-blown emergency.
Recognizing the Early Warning Signs
An air leak is probably the most common culprit. You might hear a constant hissing sound after you park or notice the needles on your air pressure gauges falling way too quickly.
Another serious issue is brake fade. This happens when brakes get too hot from overuse, especially on long downhill grades. They lose their stopping power and can start to feel "spongy" under your foot.
Finally, keep an eye on your air compressor. If it's taking forever to build pressure or if the governor is kicking on and off constantly, the heart of your air system is probably in trouble. These aren't just minor quirks; they're urgent calls to get your rig checked out.
The Spring Brake: Your Ultimate Safety Net
Every truck with an air brakes cdl system has a brilliant failsafe built right in: the spring brakes. Think of them as the system’s emergency parachute. They are massive springs held back by air pressure. As long as your system is aired up, these brakes stay inactive.
But if your air pressure drops to a critically low level—somewhere between 20 and 45 PSI—the air can no longer hold those powerful springs in check. They engage automatically and mechanically, bringing the truck to a grinding, but safe, stop. This isn't a gentle slow-down; it's a full-force emergency stop designed to prevent a catastrophe.
The spring brake system is purely mechanical. It doesn't need air pressure to apply the brakes, only to release them. This is the simple principle that makes it such a reliable failsafe.
For mastering these kinds of procedures, it's worth knowing how scenario-based training can transform learning outcomes, as it helps build the muscle memory you need for high-stakes situations.
Actionable Steps for an Air Brake Emergency
The second your low-air warning light and buzzer kick on (usually around 60 PSI), your one and only goal is to get the vehicle safely off the road. Don't wait for the spring brakes to take over.
Here’s what you need to do:
- Stay Calm: Panic is your enemy. Your training is your best friend. Keep your hands on the wheel and your focus on the road ahead.
- Find a Safe Place to Pull Over: Start looking for an escape ramp, a wide shoulder, or any open area away from traffic. Immediately hit your four-way flashers to warn other drivers.
- Use Your Engine Brake: Downshift to a lower gear. Using the engine's natural resistance is your best tool for controlling speed when your service brakes are compromised.
- Pump the Brakes Carefully: If you still have some air pressure left, use controlled, light pumps on the brake pedal. This helps conserve what little air you have while still giving you some stopping power. Whatever you do, don't fan the pedal rapidly—that will drain your air supply in seconds.
Once you’re stopped, that truck isn't moving until the air brake system has been inspected and repaired by a professional. This isn't just a suggestion; it's your legal and ethical responsibility. This kind of real-world problem-solving is a huge part of being a professional driver, and it’s just as important as anything you’ll find on the general knowledge test.
Conquering the Air Brakes Written Exam
Passing the written part of your air brakes test is about more than just memorizing a few numbers. You really have to get a feel for how the whole system works, why certain steps are so important, and what those PSI readings mean out on the road. Think of this as your personal study guide, where we'll break down the kinds of questions you can expect and the real-world logic behind the right answers.
The test zeroes in on critical ideas like stopping distances, the hidden danger of brake lag, and how the dual air brake system keeps you safe. Once you work through some practical examples and understand the why behind the what, you'll walk into that test with the confidence to nail it.
Key Topics on the Written Test
The written exam isn't trying to trick you—it's making sure you know how to operate a big rig safely. The questions almost always circle back to a handful of core safety principles. You'll definitely need to be sharp on pressure levels, reaction times, and what each part of the system does.
Here are the topics that come up again and again:
- PSI Ranges: Know these numbers by heart. The governor cuts in around 100 PSI and cuts out around 125 PSI. The low-air warning should pop on at or before 60 PSI, and the spring brakes will automatically engage somewhere between 20-45 PSI.
- Brake Lag: This is a huge one. Unlike the brakes in your car, air brakes have a tiny delay from when you hit the pedal to when the shoes actually hit the drum. That fraction of a second adds serious distance to your stop.
- Dual Air Brake Systems: You’ll need to explain that modern trucks essentially have two separate air brake systems working together. This is a brilliant safety feature; if one system fails, you still have the other to bring the vehicle to a stop.
- Water in the Air Tanks: Expect questions about why you need to drain your air tanks every single day. If you don't, water and oil can build up, freeze in the winter, and cause your brakes to fail completely.
If you focus your study time on these areas, you'll be well-prepared for the bulk of the exam.
Understanding Stopping Distance
One of the absolute must-know concepts for the air brakes test is total stopping distance. It's not as simple as how hard you can mash the brake pedal. It’s a chain reaction of different factors that add up incredibly fast, especially when you're rolling at highway speeds.
Total stopping distance is really made of three separate parts:
- Perception Distance: This is how far your truck travels from the moment you spot a hazard to the second your brain actually says, "Hey, I need to stop!"
- Reaction Distance: This is the distance covered in the time it takes you to physically lift your foot off the accelerator and move it over to the brake pedal.
- Braking Distance: This is the actual distance your truck travels after the brakes are finally applied until you come to a complete stop.
The real game-changer with air brakes is brake lag. It’s the split second it takes for the air to rush through all the lines and physically apply the brakes. That delay adds about half a second, and at 55 MPH, your truck will travel an extra 60 feet before the brakes even begin to do their job.
Understanding Air Brake Stopping Distance at 55 MPH
To really see the impact of brake lag, you have to look at the numbers. The table below breaks down every piece of the puzzle when stopping a fully loaded tractor-trailer from a speed of 55 miles per hour. It's eye-opening.
| Component | What It Means | Estimated Distance (Feet) |
|---|---|---|
| Perception Distance | The distance traveled while you see and recognize a hazard. | ~142 feet |
| Reaction Distance | The distance traveled as you move your foot to the brake. | ~61 feet |
| Brake Lag Distance | The distance traveled while the air activates the brakes. | ~32 feet |
| Effective Braking Distance | The distance traveled after the brakes are fully applied. | ~215 feet |
| Total Stopping Distance | The full distance needed to come to a complete stop. | Over 450 feet |
When you add it all up, you're looking at a total stopping distance longer than a football field. That's a sobering thought, and it's exactly why professional drivers are trained to leave a massive cushion of space in front of them. Getting these concepts down is the key to passing your exam. For some hands-on practice, you can work through an air brakes test with detailed answers that closely mimics what you'll see on the real thing.
Common Questions About the CDL Air Brakes Test
Getting ready for the air brakes test naturally brings up a lot of questions. Let's tackle some of the most common ones we hear from our students to clear things up.
How Many Questions Are on the Test?
It can change a little from state to state, but you can generally expect 25 multiple-choice questions on the written exam. To pass, you'll need to get at least 20 of them right, which works out to an 80% score.
Can I Get a CDL Without the Air Brakes Endorsement?
Technically, yes, you can. But your CDL will be stamped with a restriction that says you can't drive any commercial vehicle with air brakes. This is a huge roadblock for your career since almost all Class A and B trucks rely on them.
Think of it this way: a CDL without the air brakes endorsement is like being a chef who can't use an oven. It closes the door on the vast majority of trucking jobs out there.
What Happens if I Fail the Air Brakes Part of the Skills Test?
Failing the air brake inspection during your pre-trip is an automatic failure for the entire CDL skills test. You won't even get to the driving part. It's a setback, for sure, but you can always retest after a waiting period, though you might have to pay another fee.
What if My CDL Already Has an Air Brakes Restriction?
If you earned your CDL but didn't pass the air brakes portion, you'll have an "L" or "Z" restriction on your license. An "L" restriction means you're legally barred from operating any truck with an air brake system.
The good news is you can get it removed by going back and passing both the written test and the hands-on skills test for air brakes. If you need a focused game plan, our E-restriction removal course is designed to give you the specific training needed to lift that restriction and unlock better job opportunities.
At Patriot CDL, we don't just teach you to pass a test; we make sure you have the real-world knowledge and hands-on confidence to start a successful, restriction-free career.