If you want to drive a commercial vehicle with air brakes, you’ve got to master the CDL air brake test. This isn't just an optional add-on; it's a mandatory exam that includes both a written test and a hands-on skills check. The goal is to prove you're safe and competent behind the wheel of a rig.
What Is the CDL Air Brake Test
Think of the CDL air brake test as a critical milestone on your journey to becoming a professional driver. It's not just another box to check—it’s a non-negotiable part of your CDL exam. Passing it shows you have the know-how to manage the one system responsible for stopping 80,000 pounds of steel.
This test is a two-part challenge. It’s designed to make sure you know the system inside and out, from the theory of how it works to the practical steps of checking it yourself. You’ll have to ace both parts to get that all-important air brake endorsement on your license.
The Two Core Components of the Test
The exam is built to make sure you're truly proficient with every aspect of air brake operation. It breaks down into two main parts:
- Written Knowledge Exam: You'll sit down at a computer for a multiple-choice test, usually with about 25 questions. This part covers all the technical stuff—what each component does, how to use the system correctly, and all the safety protocols you need to know.
- Practical Skills Demonstration: This is the hands-on portion, and it happens during your pre-trip inspection. You'll have to physically inspect the entire air brake system while explaining every single step out loud to the examiner. It’s your chance to prove you can spot a problem before it becomes a disaster on the road.
The ultimate goal of the CDL air brake test is to build a foundation of safety. It ensures every licensed driver understands how to inspect, operate, and troubleshoot the most critical safety feature on their truck.
Why This Test Is Your Gateway to a Driving Career
Getting the air brake test behind you is the first real step toward a long, safe, and successful career in trucking. What you learn here isn't just for the exam; it’s the fundamental knowledge that will make you a confident and employable driver from your very first day. You can learn more about the training requirements for new drivers in our guide to ELDT certification.
Here’s something to think about: passing the air brake test on your first try really sets you up for success. Top-tier truck driving schools report that with targeted preparation, their students achieve pass rates exceeding 90%. This shows just how much quality training matters when you're facing multiple-choice questions on everything from basic operations to troubleshooting air leaks and low-pressure warnings.
How a Commercial Air Brake System Works
To ace your CDL air brake test, you can't just memorize facts. You need to really understand the machine you're about to command. I like to think of a truck's air brake system like a living, breathing thing—a network of connected parts all working in concert. It's an incredibly powerful and reliable setup, but only if you know how each piece plays its part in stopping an 80,000-pound rig.
Let's move past rote learning and build a solid mental picture of how it all connects. When you can see it as a complete system in your mind's eye, the technical details just click into place, especially when you're under the pressure of the test.
The Heart and Lungs of the System
Right at the center of it all is the air compressor. This is the heart of your truck's braking system. Its one and only job is to pump air into the storage tanks, and since it’s usually driven by the engine, it only works when the engine is running. This is where the stopping power is born.
That compressed air then gets pushed into the air storage tanks—think of these as the lungs. A typical rig has several tanks that hold a reserve of high-pressure air, enough to let you brake multiple times even if the compressor suddenly failed. This built-in backup is a critical safety feature mandated by federal law.
The entire air brake system is built on a genius fail-safe idea: air pressure is used to hold the brakes back, not to apply them. If you ever have a catastrophic loss of air, powerful springs automatically engage the brakes and bring the truck to a stop.
The Brain and Nerves
The air compressor governor is the brain of this whole operation. It’s a smart little device that manages the air pressure, keeping it in the sweet spot. It tells the compressor to kick on (the "cut-in" pressure) when the system drops to around 100 psi and to shut off (the "cut-out" pressure) once the tanks are full at about 125 psi. This prevents the system from getting over-pressurized while making sure you always have power on tap.
Connecting everything are the brake lines, which are like the system's veins. These hoses carry the compressed air from the tanks all the way to the brakes on each wheel, delivering stopping power the instant you touch that pedal.
The Muscles That Do the Heavy Lifting
When you press the brake pedal, you're sending a command down the line to the components that do the actual work. This is where the air pressure gets turned into raw stopping force.
- Brake Chambers: Located at each wheel, a brake chamber is a round canister that fills with air. This air pushes on a diaphragm inside, which forces a rod to move outward.
- Slack Adjusters: The pushrod is connected to a lever called a slack adjuster. This crucial part takes the straight-line push from the rod and turns it into a powerful twisting motion.
- S-Cams and Brake Shoes: The slack adjuster rotates a shaft with an S-shaped cam on the end. As the "S-cam" turns, it forces the brake shoes to spread apart and press against the inside of the brake drum. That friction is what slows the wheel down.
Getting this chain of events straight in your head—from your foot on the pedal to the shoes on the drum—is absolutely vital. During the CDL air brake test, the examiner won't just ask you to point at parts; they'll want you to explain how they all work together to stop the vehicle safely. This knowledge is just as fundamental as what's covered in our general knowledge test guide. Nail these concepts, and you'll not only pass the test but also know how to spot problems during your pre-trip inspection.
The Step-by-Step Air Brake Pre-Trip Inspection
Alright, this is where the rubber meets the road—or more accurately, where your knowledge gets put into action. The practical skills portion of your CDL air brake test isn't just about knowing the theory; it’s about proving you can walk through the in-cab pre-trip inspection flawlessly.
Think of it as a performance. The examiner needs to see you perform each step correctly, in the right order, while you explain exactly what you're doing and why. You're the expert in the driver's seat. Master this sequence, and you'll project confidence, competence, and most importantly, safety. Let’s break down the seven critical checks you need to have down cold.
H3: Starting the Engine and Initial Checks
First things first, you have to set the stage for the inspection. Before diving into the nitty-gritty, you'll start the truck and get the system ready.
- Secure the Vehicle: Out loud, you'll announce, "My vehicle is in neutral, and my parking brakes are set." This is your starting line—a simple but critical safety declaration.
- Start the Engine: Fire up the engine. This kicks the air compressor into gear, and it will immediately start filling the air tanks.
- Build to Governor Cut-Out: As the needles on your air gauges climb, explain your goal: "I am now building my air pressure to the governor cut-out, which should be between 120 and 140 PSI." Keep an ear out for that classic "pssh" sound. That's the governor telling the compressor to stop pumping, and you'll want to point out the PSI reading to the examiner when it happens.
The Applied Leakage Test
Now that your system is fully charged, it's time to hunt for leaks. This is arguably one of the most crucial parts of the entire CDL air brake test, and examiners watch it like a hawk.
Start by turning the engine off, but turn the key back to the "on" or "accessory" position. Your gauges and warning lights need power. Next, release the parking brakes by pushing in both the yellow and red knobs on the dash.
With the brakes released, press the service brake pedal down firmly and hold it. Announce clearly, "I am now performing the applied brake leakage test. After the initial drop, I should not lose more than 4 PSI in one minute for a combination vehicle."
You have to keep that pedal pressed for a full 60 seconds while your eyes are glued to the air gauges. The examiner will be timing you, so don't rush it. This isn't just a random test; it's a strict federal standard. A huge number of CDL applicants fail right here because they get a small detail wrong, like not holding the pedal for the full minute.
Checking the Warning Systems
Once you've proven the system can hold pressure, your next job is to make sure the warning systems work. These lights and buzzers are your lifeline if you start losing air on the road.
To do this, you'll start "fanning" the brake pedal—just pumping it repeatedly to bleed air out of the system. While you're doing it, tell the examiner, "I am now fanning the brakes to test my low air warning alarm."
Keep pumping until the warning light on your dash illuminates and the buzzer starts screaming. You need to call out the pressure when it happens. "My low air warning alarm came on at approximately 60 PSI, which is within the safe operating range." Legally, the alarm has to activate at or above 55 PSI, so anything in that ballpark is a pass.
This simple diagram helps visualize what you're actually testing—the flow of air from its source to where it does the work.
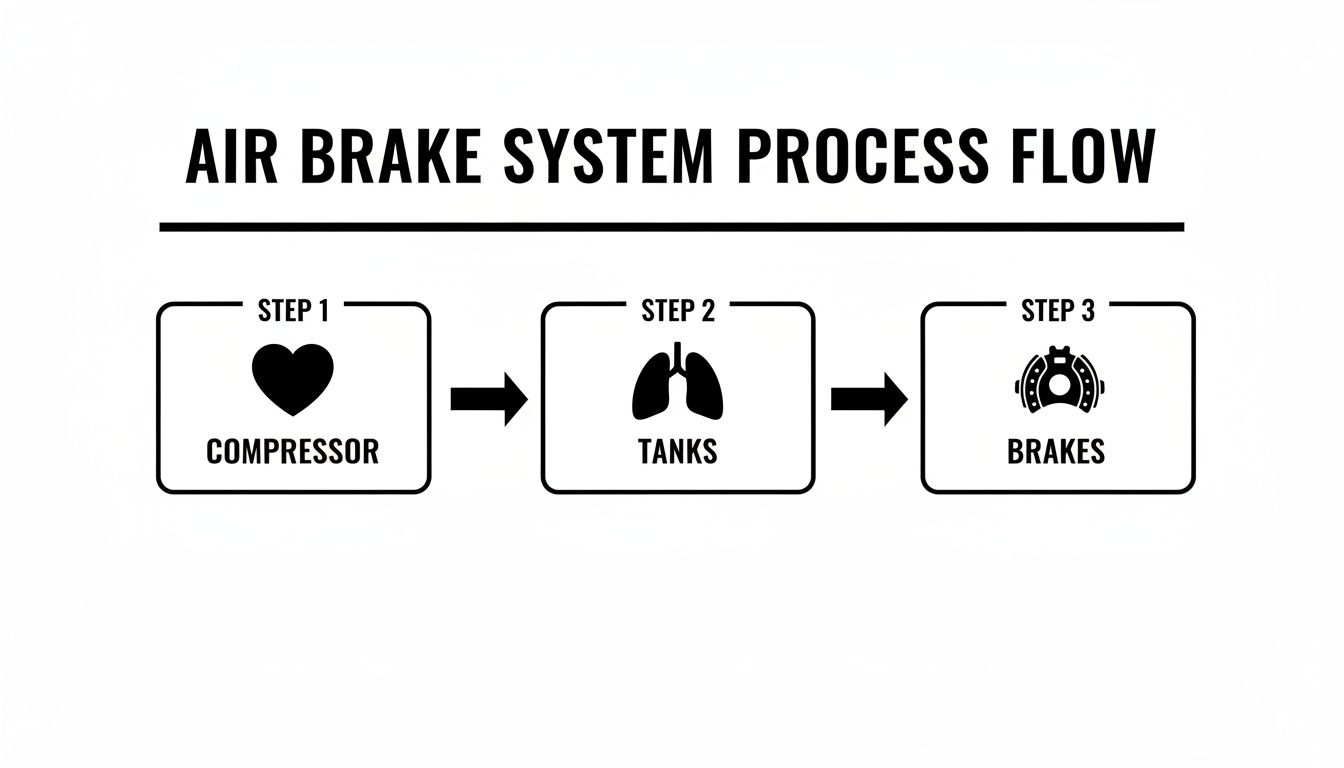
Think of it this way: the compressor is the heart, the tanks are the lungs, and the brakes are the muscles. You're making sure the whole body is working together.
The Final Brake Pop-Out Test
The last check is a big one. You need to confirm that the spring brakes—your emergency fail-safe—will automatically engage if the air pressure gets dangerously low.
Right after your low-air alarm has gone off, just keep fanning the brake pedal. Explain what you're doing: "I will now continue to fan the brakes to test the tractor protection and parking brake valves."
You'll feel the pedal get soft as you keep pumping. Suddenly, the yellow and red knobs on your dash will pop out on their own. That's your cue. Announce, "My brake knobs popped out between 20 and 45 PSI, which means my spring brakes have engaged correctly."
That's the entire sequence. It's the core of your practical test, and each step logically follows the last to prove the whole system is safe. This is just one piece of the overall vehicle inspection puzzle, much like a car safety inspection checklist covers the basics for a passenger vehicle, but far more detailed. For a look at the bigger picture, check out our complete guide to the pre-trip inspection.
To help you memorize the critical numbers, here is a quick-reference table.
Air Brake Test Pressure and Time Limits
This table breaks down the key numbers you absolutely must have memorized for the practical skills test.
| Test Component | Acceptable PSI Range or Time Limit |
|---|---|
| Governor Cut-Out | 120 – 140 PSI |
| Applied Leakage Test (Combo Vehicle) | Lose no more than 4 PSI in one minute |
| Low-Air Warning Alarm | Must activate at or above 55 PSI (typically around 60 PSI) |
| Spring Brake Pop-Out | Must occur between 20 – 45 PSI |
Drill these numbers until they are second nature. Knowing them is the difference between passing and failing.
Common Mistakes to Avoid on Test Day
You can study for hours, but the pressure of test day has a way of tripping people up. Even drivers who know the air brake system inside and out can make simple mistakes that lead to a failing grade. Knowing what these common pitfalls are is the best way to steer clear of them.
Ultimately, the examiner is looking for a smooth, confident performance. Forgetting a step, fumbling with the numbers, or looking unsure sends the wrong message. It’s usually nerves, not a lack of knowledge, that causes these stumbles.
Forgetting to Talk Through Every Single Action
This is probably the most common mistake I see. A student will perform a check perfectly but forget to say what they're doing out loud. Remember, the examiner isn't a mind reader. They can only grade you on what you say and do.
For instance, if you glance at your gauge and see it's at 125 PSI but don't announce, "My air pressure has built to 125 PSI, and I heard the governor cut out," you might not get credit for that step. You have to narrate everything, from chocking the wheels to testing the spring brake pop-out.
Pro Tip: Imagine you're teaching the examiner how to do the inspection. Talk them through every single thing you do, no matter how small. It’s impossible to over-communicate here.
Mixing Up the Inspection Sequence
There's a reason the in-cab air brake inspection follows a specific order. Each step builds on the last, and doing them out of sequence can throw off your results and confuse you. Worse, it can lead to an automatic failure.
A classic example is trying to test the low-air warning alarm before doing the applied leak test. The whole inspection is a safety sequence, not just a list of random checks. Getting the order wrong makes the entire test invalid.
Getting the Critical PSI Numbers Wrong
You absolutely have to know your numbers. It’s not negotiable. Air brake systems are on over 95% of commercial trucks with a GVWR of 26,001 pounds or more, so this stuff is serious business. The examiner needs to hear the right pressure loss rates: no more than 3 psi in one minute for a straight truck or 4 psi for a combination vehicle during the applied leak test. Forgetting these or mixing them up is a huge red flag.
That timed, one-minute test is where a lot of people mess up. Another common slip is not holding the brake pedal down firmly for the full 60 seconds.
Common Test-Day Errors at a Glance
Keep these potential blunders in your head so you can actively avoid them. Here's a quick checklist to run through before you start:
- Rushing: Nerves make you want to go fast. Don't. Take a deep breath and move through each step at a deliberate, steady pace.
- Not Watching the Gauges: Your eyes need to be glued to those air pressure gauges. You have to call out the reading at the exact moment the governor cuts out or the low-air alarm sounds.
- Botching the Tug Test: It sounds simple, but a surprising number of people forget to properly test the parking and service brakes against the truck's power.
- Ignoring the Clock: That one-minute applied leak test is strict. Don't guess. Use a watch with a second hand or ask to see the examiner’s timer.
By knowing where others go wrong, you can turn these potential weak spots into moments where you really shine. It’s your chance to show the examiner you’re not just reciting steps—you truly understand the system.
Practice Questions for the Written Knowledge Exam
Nailing the hands-on, in-cab inspection is a huge part of the process, but it's only half the battle. To get that air brake endorsement on your CDL, you also have to pass a written knowledge exam. This is usually about 25 multiple-choice questions long.
Think of it this way: the practical test proves you know how to inspect the system, while the written test confirms you understand why it all works. Passing means you get the core concepts, from what each part does to bigger ideas like brake lag and how to manage a long downhill grade.
The sample questions below are just like what you'll find on the real deal. Don't just quiz yourself—use them as a tool. Figure out which topics you're solid on and which ones need a little more time in the books.
Sample Questions and Detailed Explanations
Let's walk through a few questions. I'll give you the correct answer, but more importantly, I’ll break down the logic behind it. Getting the reasoning right is what will really prepare you for test day.
1. The air compressor governor controls:
A) The speed of the air compressor.
B) When the air compressor pumps air.
C) The air pressure applied to the brakes.
D) The temperature of the compressed air.
Correct Answer: B
Explanation: The governor is basically the boss of the air supply system. Its only job is to tell the compressor when to start filling the tanks (at the "cut-in" pressure, around 100 PSI) and when to stop (at the "cut-out" pressure, which is typically 125 PSI). It has nothing to do with the compressor's speed or the pressure you send to the brakes when you step on the pedal.
2. The braking power of the spring brakes:
A) Is determined by the air pressure in the system.
B) Depends on the adjustment of the slack adjusters.
C) Increases when you press the brake pedal.
D) Can only be tested by a certified mechanic.
Correct Answer: B
Explanation: This is a safety concept you absolutely have to know. The massive springs inside the brake chambers provide a constant, powerful force. However, that force is useless if the brakes are out of adjustment. If your slack adjusters are not set correctly, the spring brakes won't be able to apply enough friction to stop the vehicle.
Remember, the spring brakes are your mechanical fail-safe. They’re designed to kick in automatically using pure spring force when air pressure drops to a dangerously low level, usually somewhere between 20 and 45 PSI.
More Advanced Scenarios and System Knowledge
The test isn't just about naming parts. It will throw scenarios at you that test whether you understand how the whole system behaves on the road. This is where really knowing your stuff pays off.
3. During an applied air leak test on a combination vehicle, the maximum acceptable pressure loss in one minute is:
A) 2 PSI
B) 3 PSI
C) 4 PSI
D) 6 PSI
Correct Answer: C
Explanation: The federal standards are very specific here, and you have to know the numbers. When you're testing a combination vehicle (like a tractor-trailer), you can't lose more than 4 PSI in one minute with your foot holding the service brake down. For a single vehicle (like a straight truck), that limit is tighter at 3 PSI. It's a small detail, but one the test will expect you to know.
4. What is "brake lag"?
A) The time it takes for the brake drums to cool down.
B) The time required for air to flow through the lines and apply the brakes.
C) The distance the truck travels after the brakes are released.
D) A delay caused by wet brake linings.
Correct Answer: B
Explanation: Air brakes aren't instantaneous like the hydraulic brakes in your car. There's a slight delay from the moment you hit the pedal to when the brake shoes actually press against the drums. That delay is "brake lag." It might only be about half a second, but at 55 MPH, that half-second means your truck travels over 40 feet before the brakes even start working.
These examples show why you can't just memorize facts. You have to understand them. To really put your knowledge to the test, check out the full set of questions in our free online air brakes practice test.
Frequently Asked Questions About the Air Brake Test
Even after hours of studying, it's natural to have a few last-minute questions buzzing around in your head. Let's clear those up right now so you can walk into your exam feeling prepared and confident, not stressed.
How Many Questions Are on the Air Brake Knowledge Test?
You can expect to see 25 multiple-choice questions on the written knowledge test. The passing score is 80%, which means you need to get at least 20 questions right to move on.
These questions aren't just trivia; they're designed to make sure you truly understand the hardware you'll be relying on every day. They'll cover everything from identifying parts and their functions to knowing the critical PSI numbers for your in-cab inspection.
What Happens if I Fail the Air Brake Test?
First off, don't panic. Failing the air brake test—whether it's the written part or the hands-on inspection—is a setback, not a dead end. Every state lets you retake it.
The rules on retesting vary. Some states might let you try again the next business day, while others may enforce a longer waiting period. Your best bet is to check directly with your local DMV for their specific policy. The most important thing is to use it as a learning experience. A failed test tells you exactly where your weak spots are.
A failed test is just feedback. It’s a roadmap showing you exactly what to study before you go back and ace it.
Do I Need an Air Brake Endorsement for a Class B CDL?
Yes, absolutely. If the Class B truck you plan on driving has air brakes, you must have the endorsement. A Class B license covers single vehicles over 26,001 pounds—think dump trucks, box trucks, and school buses—and the overwhelming majority of them are equipped with air brakes.
If you skip the endorsement, your CDL will be stamped with an "L" restriction, which legally bars you from operating any commercial vehicle with an air brake system. This severely limits your job options, making the endorsement a practical necessity for almost every Class B driver. If you're already licensed but need this restriction gone, an E-restriction removal course might be what you're looking for.
Can I Use Notes During the Practical Air Brake Test?
No, you can't use any notes, checklists, or guides during the practical, in-cab portion of the test. The examiner needs to see that you know the entire procedure by heart.
This is why practice is so critical. You need to run through the seven-step inspection sequence over and over until it's pure muscle memory. The goal is to perform the entire test confidently and correctly from memory, proving you're ready to safely manage the system on your own.
At Patriot CDL, we don't just teach you how to pass the test; we make sure you have the deep-seated knowledge to be a safe, confident professional driver. Our instructors guide you through every step, especially mastering the air brake system. Find out how we help our students succeed at https://patriotcdl.com.