


The driver’s seat and safety belt are easy to treat as two separate cab items: sit down, pull the belt across, hear a click, and move to the next part of the inspection. A professional CDL routine is more deliberate. The seat must be attached to the truck, the adjustment mechanism must hold the selected position, and the restraint must travel from sound anchorages across the driver without twists, damage, or interference. If one part fails, the entire seating-and-restraint system may not do its job.
This guide gives CDL students and working drivers a repeatable way to inspect that system without pretending to be mechanics. It separates federal requirements from practical training habits, follows the Pennsylvania skills-test language, and shows how to make a clear report when something is wrong. Always use the exact procedure approved by the vehicle manufacturer, your school, and your carrier.
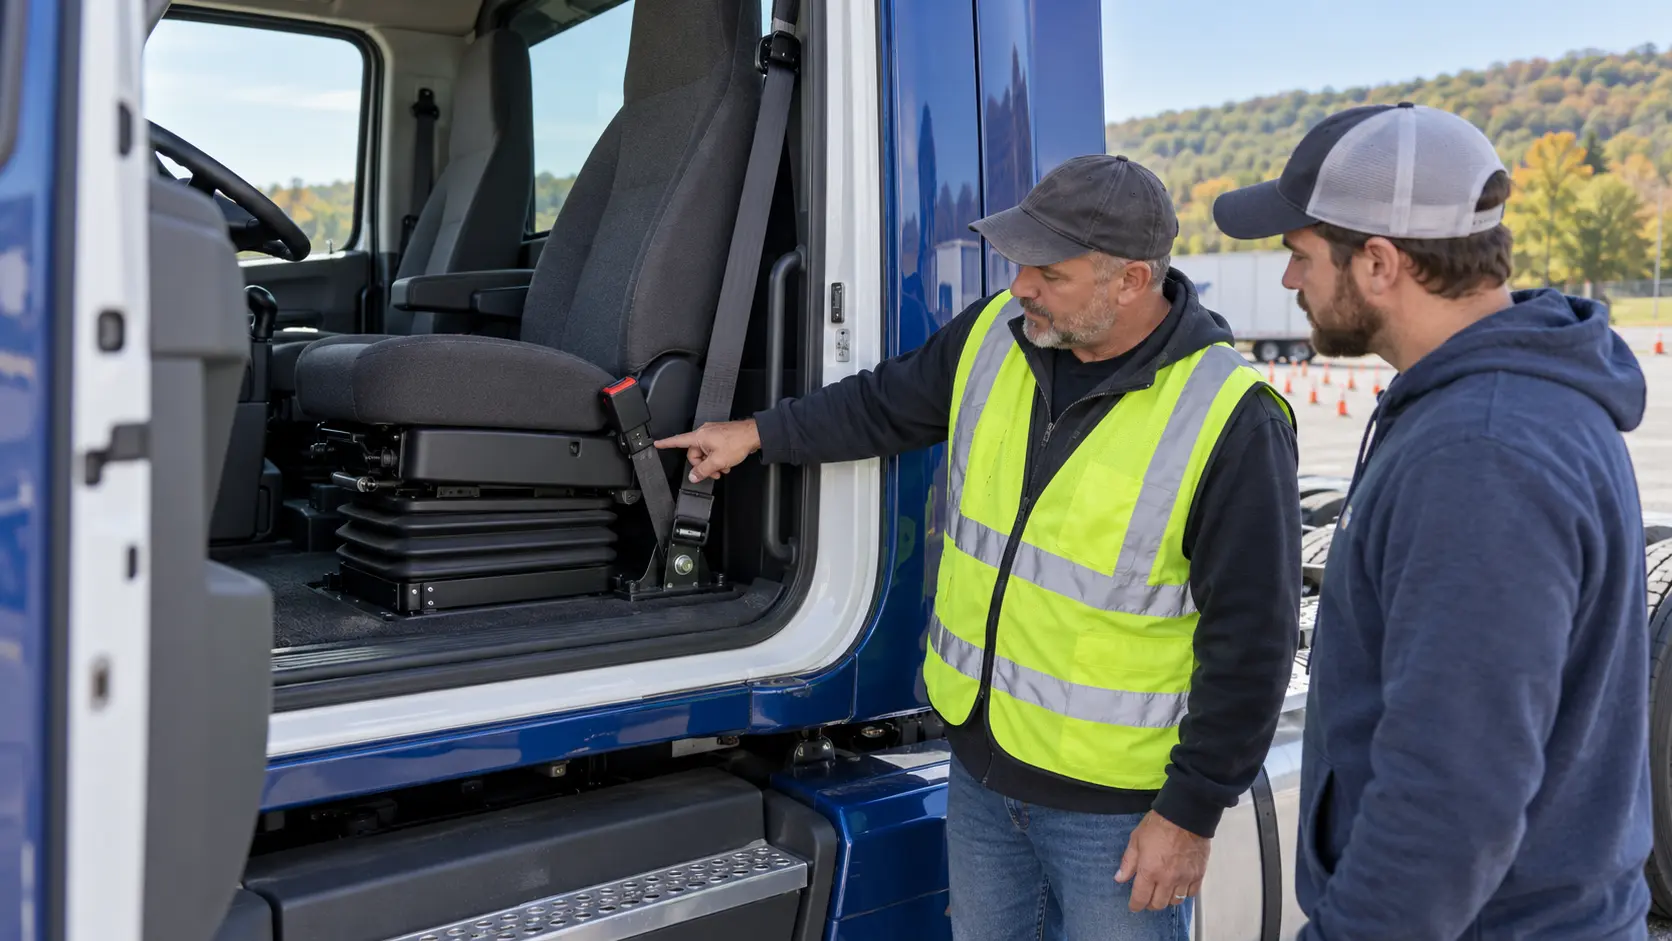
Why the Seat and Belt Form One Safety System
A belt is not a loose strap that works independently of the cab. Its effectiveness depends on the seat, the buckle stalk, the retractor, the webbing path, and each anchorage staying where the manufacturer intended. A buckle that clicks does not prove that a loose seat pedestal is acceptable. A solid seat does not excuse a cut belt. The useful inspection question is therefore not “Did it latch?” but “Is the complete system secure, undamaged, correctly routed, and able to restrain the occupant?”
Inspection is not repair authorization
A driver may inspect secure mounting, operate normal adjustments, and test the latch and release. That does not authorize tightening structural fasteners, opening a retractor, modifying a buckle, splicing webbing, or substituting hardware. Those tasks belong to qualified maintenance using manufacturer information.
What the Rules Actually Require
The current federal rules establish both equipment and use requirements. addresses seats, seat-belt assemblies, and anchorages for commercial motor vehicles, with requirements that depend on vehicle type and manufacture date. FMCSA’s official explanation states that Section 393.93 requires belts on trucks, truck tractors, and buses manufactured on or after January 1, 1965, and that later vehicles must comply with the applicable federal motor vehicle safety standards. Do not use this date summary to decide whether a particular component can be removed or altered; verify the exact vehicle configuration and manufacturer requirements.
governs use. A driver may not operate—and a motor carrier may not require or permit operation of—a commercial motor vehicle with a driver-seat belt assembly unless the driver is properly restrained. For a property-carrying CMV with installed belts at other occupant seats, the rule also requires those occupants to be properly restrained. Separately, states that all seats must be securely mounted.
The Pennsylvania skills-test standard
The gives a concise performance standard: check that the safety belt is securely mounted, adjusts, latches properly, and is not ripped or frayed. That sentence is useful for test preparation, but it is a floor rather than a complete shop procedure. A student should be able to identify the visible parts, demonstrate the normal functions, and explain what a defect means without inventing measurements or repair decisions.
These requirements complement one another. Section 393.93 addresses the installed equipment, Section 393.203 addresses secure seating, Section 392.16 addresses actual use, and PennDOT describes what the applicant must demonstrate in the inspection. Carrier policy and manufacturer instructions may add vehicle-specific checks. Practice advice in the rest of this article helps organize those obligations; it does not replace them.
Prepare the Cab Before Touching the Controls
Begin in an approved area with the vehicle secured under school or carrier procedure. Keep the parking brake applied, place the transmission in neutral or park as appropriate, and control the key as directed. Check the steps, grab handles, and cab floor. Enter facing the cab with three points of contact; never pull on the steering wheel or belt webbing.
Remove loose bags, bottles, tools, and clothing that could obstruct the pedal area, seat tracks, buckle, or belt retractor. Look behind and below the seat with a flashlight if the approved procedure permits. Do not place fingers inside a track, hinge, spring, or suspension linkage. A seat can move suddenly when the adjustment release is operated or air pressure changes.
Start with a neutral visual scan
Before sitting down, compare the left and right sides of the seat base. Look for a tilted pedestal, separated trim, obvious cracks, displaced covers, missing visible hardware, fresh scrape marks, or objects caught in the mechanism. Follow the belt from its upper guide or retractor to its lower anchor and buckle. This first scan preserves clues that can disappear once the seat is moved.
Inspect the Seat, Base, Tracks, and Adjustments
Mounting points and structure
Check the visible connection from the seat frame to the suspension or pedestal and from the base to the cab floor. The seat should appear securely mounted, without missing visible fasteners, broken brackets, cracked structural parts, or unintended movement at a joint. Do not confuse a flexible cushion, lumbar support, or designed suspension travel with loose structure. If uncertain, compare the movement with a known serviceable vehicle of the same design or ask qualified maintenance.
Tracks, slides, and lock engagement
Operate the fore-and-aft release normally. The seat should travel through the needed range without a tool, and the track should lock after the control is released. Check more than one position because a worn or obstructed track may hold in one place and slip in another. After adjustment, apply gentle forward and rearward pressure. Any free travel beyond designed clearance, incomplete engagement, or a handle that remains released is a reason to stop and report.
Air suspension, height, and seatback controls
An air-suspension seat should respond through its intended controls and remain within its operating range. Listen for an unusual continuous air leak near the seat, while remembering that a brief sound during adjustment can be normal. Check that height, tilt, lumbar, damper, and seatback controls—if fitted—hold the selected position. The manufacturer’s instructions, not a generic number, determine normal travel and operation.
If the seat drops, rises unexpectedly, will not hold a setting, or places the driver where controls cannot be reached, report the symptom precisely. The related truck frame and cab inspection plan explains how to separate visible cab observations from unauthorized diagnosis.
Inspect the Belt From Anchorage to Buckle
Anchorages and belt path
Trace the belt’s full visible path. Check the upper guide or shoulder point, retractor housing, lower lap-belt anchorage, buckle stalk, and any seat-mounted attachment. They should be present, aligned, and visibly secure without a missing fastener, cracked bracket, separated trim that exposes damage, or routing around an unintended object. Some systems attach to the cab, some to the seat, and some use a combination. Do not judge one design by another truck’s layout.
Webbing condition and retractor function
Pull out enough webbing to inspect both surfaces that are reasonably visible. Look for cuts, fraying, torn edges, melted or burned areas, heavy abrasion, contamination that stiffens the fabric, knots, stitching separation, or a previous repair. Do not mark the belt with a pen, apply a cleaner, or trim fuzzy edges. Report the location and type of damage.
Allow the belt to retract in a controlled manner. It should not remain slack because it is twisted, dirty, caught, or obstructed. Then test the locking behavior only as the manufacturer or training procedure directs; many emergency-locking retractors respond to a sharp pull, but designs vary. A driver inspection confirms normal function. It does not open the retractor or certify internal parts.
Buckle, latch plate, and release
Inspect the metal latch plate and buckle opening for obvious damage or foreign material. Insert the latch plate without forcing it. Confirm positive engagement by applying a firm, controlled pull, then operate the release and verify that it lets go normally. A click by itself is not enough if the latch pulls free, the release sticks, or the belt can be inserted only at an unusual angle.
Keep the buckle accessible beside the driver rather than buried under the seat, squeezed between cushions, or extended by an unapproved device. If the buckle stalk is twisted, follow the approved procedure rather than rotating the mounting hardware. Any condition that prevents secure latching or easy release should be reported before operation.
Set a Safe Driving Position and Belt Fit
Once the hardware passes the inspection, adjust the seat for stable control. The driver should be able to depress the clutch and service brake through the required range, operate the accelerator smoothly, and reach steering and primary controls without stretching or locking the knees. Maintain a clear view of gauges, mirrors, and the road. The exact position depends on the truck and the driver; this is practical control advice, not a universal legal measurement.
Place the lap portion low across the hips rather than the abdomen. Route the shoulder portion across the chest and over the shoulder, not behind the back, under the arm, or off the shoulder. Remove twists and take up slack according to the system’s design. Heavy clothing, tools on the beltline, or a bulky cushion can change the route, so repeat the fit check whenever the seating position or clothing changes.
After setting seat height and distance, latch the belt again and recheck mirrors and the forward view. The windshield, wiper, and clear-view inspection plan covers that visibility sequence. If correct control reach and belt routing cannot both be achieved, request an approved equipment solution rather than defeating the restraint.
Seat and Belt Findings: What Should the Driver Do?
| Observation | What it may affect | Driver action |
|---|---|---|
| Seat moves only when an adjustment control is operated, then locks | Normal positioning, if consistent with the design | Set the driving position and confirm the lock again |
| Seat rocks at the floor, pedestal, or track with the control released | Secure mounting and stable vehicle control | Stop; identify the movement location and report it |
| Webbing is twisted but otherwise undamaged | Correct belt routing and fit | Unlatch and remove the twist by the approved method; recheck the full path |
| Webbing is cut, frayed, burned, stiff, or repaired | Restraint condition | Do not improvise; report it for qualified evaluation |
| Buckle clicks but releases under a firm pull | Secure latching | Treat it as a failed latch and do not drive |
| Belt will not retract or remains loose across the driver | Slack control and intended restraint function | Check only for a visible twist or obstruction; otherwise report it |
| Accessory changes the belt path or blocks retraction | Fit and function | Do not use it unless specifically approved; restore the approved configuration |
| Driver cannot reach controls while keeping correct belt routing | Vehicle control and occupant protection | Do not defeat the belt; request an approved seating solution |
Worked Scenario: The Truck Returns After a Seat Replacement
A student is assigned a day-cab tractor that returned from service after the driver’s seat was replaced. The work order is closed, and the truck looks clean. During the walk-in visual scan, the student notices that the buckle stalk is angled toward the seat base. The belt is not visibly cut, so it would be tempting to buckle up and continue.
Step 1: Inspect before changing the evidence
The student secures the truck, enters with three points of contact, and looks beneath the seat without reaching into the tracks. The base appears attached, but gentle pressure produces a small rocking motion at the right track while the release handle is fully returned. The student does not tighten anything. Instead, the student asks the instructor to observe the same location.
Step 2: Trace and operate the restraint
Next, the student follows the belt from the retractor through the upper guide to the latch plate, lower anchor, and buckle. The webbing is sound, but the buckle stalk has been routed on the wrong side of a seat-frame bracket. It still clicks. When the seat slides forward, however, the bracket pushes the buckle sideways and the webbing rubs the edge.
Step 3: Make a factual report
The student reports: “Driver seat has unintended movement at the right track with the adjustment released. The buckle stalk is routed against the seat-frame bracket, and moving the seat causes side pressure on the buckle and belt contact with the bracket. Vehicle not used pending qualified inspection.” This is stronger than “seat belt bad.” It names the truck position, conditions, observed movement, and operational consequence without guessing which fastener or part caused it.
Step 4: Verify the corrected condition
Qualified maintenance corrects the installation under the manufacturer procedure. Before the truck returns to training, the designated person verifies the work. The student then repeats the entire driver inspection: secure mounting, track lock at more than one position, full belt path, webbing condition, controlled retraction, positive latch, normal release, final seat fit, and mirror view. A repair label or verbal assurance does not replace this functional recheck.
Report the Defect and Protect the Next Driver
A useful defect report identifies the unit, date and time, driver position, operating condition, exact component area, and what happened. “Seat slides about one inch after handle is released” is more actionable than “loose seat.” “Latch plate enters buckle and clicks, but releases during firm pull check” is better than “belt broken.” Do not write that a truck is “DOT illegal” unless a person authorized and qualified to make that determination has done so.
Follow the school or carrier’s reporting channel. That may include a pre-trip defect form, electronic maintenance request, supervisor notification, or driver vehicle inspection report. A DVIR is governed by a specific post-trip framework; the post-trip inspection and DVIR handoff guide explains how to separate the observation, repair certification, and next-driver review.
After a repair, inspect again rather than relying on memory. Document the result through the same approved process. A component can be newly installed and still be routed incorrectly, adjusted poorly, or obstructed by another item. Verification closes the loop.
Common Seat and Safety-Belt Inspection Mistakes
- Checking only for a click: positive engagement also needs a controlled pull check and normal release.
- Ignoring the seat base: secure belt hardware cannot compensate for unintended seat movement.
- Calling all movement a defect: designed adjustment and suspension travel are different from looseness at a mounting point.
- Inspecting only the exposed shoulder section: damage can occur near a lower anchor, buckle, guide, or retractor entrance.
- Testing the belt in only one seat position: routing and track engagement can change as the seat moves.
- Putting the belt behind the back or under the arm: this defeats the intended routing even when the buckle is latched.
- Adding a clip or extender without approval: an accessory can create slack, block retraction, or change the load path.
- Repairing frayed webbing: tape, trimming, stitching, or cleaning chemicals are not driver repairs.
- Using vague language: a precise location and symptom help maintenance reproduce the condition.
- Skipping the post-repair recheck: every return to service needs a fresh functional inspection.
Commercial-Truck Seat and Safety-Belt Checklist
Use this checklist as a study and communication aid. Adapt it to the actual vehicle, manufacturer instructions, and school or carrier policy.
- □ Vehicle is secured in the approved inspection area before I enter.
- □ Steps, grab handles, cab floor, and pedal area are clear.
- □ I use three points of contact and keep hands away from pinch points.
- □ Seat frame, pedestal or suspension, tracks, and visible floor mounts appear secure.
- □ There are no obvious cracked brackets, missing visible fasteners, or unintended rocking.
- □ Fore-and-aft adjustment moves normally and locks in more than one tested position.
- □ Height, seatback, lumbar, tilt, and air-suspension controls hold as designed, if equipped.
- □ Belt anchorages, retractor, guides, latch plate, and buckle are present and visibly secure.
- □ Webbing is not cut, frayed, burned, heavily abraded, contaminated, knotted, or repaired.
- □ Belt is not twisted, pinched, trapped under the track, or routed across a sharp edge.
- □ Webbing extends and retracts without harmful slack or obstruction.
- □ Latch engages positively, holds during a controlled pull, and releases normally.
- □ Seat position gives stable pedal, steering, gauge, mirror, and forward-view access.
- □ Lap belt lies low across the hips and shoulder belt crosses the chest and shoulder.
- □ No unapproved clip, extender, cushion, cover, or other accessory interferes.
- □ I repeat the latch, fit, and routing check after final seat adjustment.
- □ Any defect is described by location and symptom through the approved reporting process.
- □ The truck is not used until required evaluation, repair, and release are complete.
Frequently Asked Questions
Can a CDL student drive if the seat belt does not latch securely?
No. A belt that will not latch securely cannot properly restrain the driver. Stop the inspection, report the defect through the school's or carrier's process, and use the vehicle only after qualified personnel have corrected and verified the condition.
Does a seat belt need replacement if the webbing is frayed?
Frayed, cut, burned, or badly abraded webbing is a defect to report, not a condition for a student to judge or repair. Qualified maintenance should follow the vehicle and restraint manufacturer's instructions and determine the correct replacement action.
Should the driver's seat move during an inspection?
The seat may move through its designed adjustment or air-suspension travel, but it must remain securely mounted. Unintended rocking, loose fasteners, a track that will not lock, or movement at the floor or pedestal should be reported before driving.
Can clips, cushions, or aftermarket accessories be added to a commercial-truck seat belt?
Do not add an accessory merely for comfort. Use only items approved for that vehicle and restraint system by the manufacturer and carrier, and never use anything that changes belt routing, prevents retraction, interferes with the latch, or hides damaged webbing.
Official Sources Reviewed
Educational information only, not legal or maintenance advice. Regulations, testing procedures, manufacturer instructions, and carrier policies can change. Official sources were reviewed November 1, 2026.