


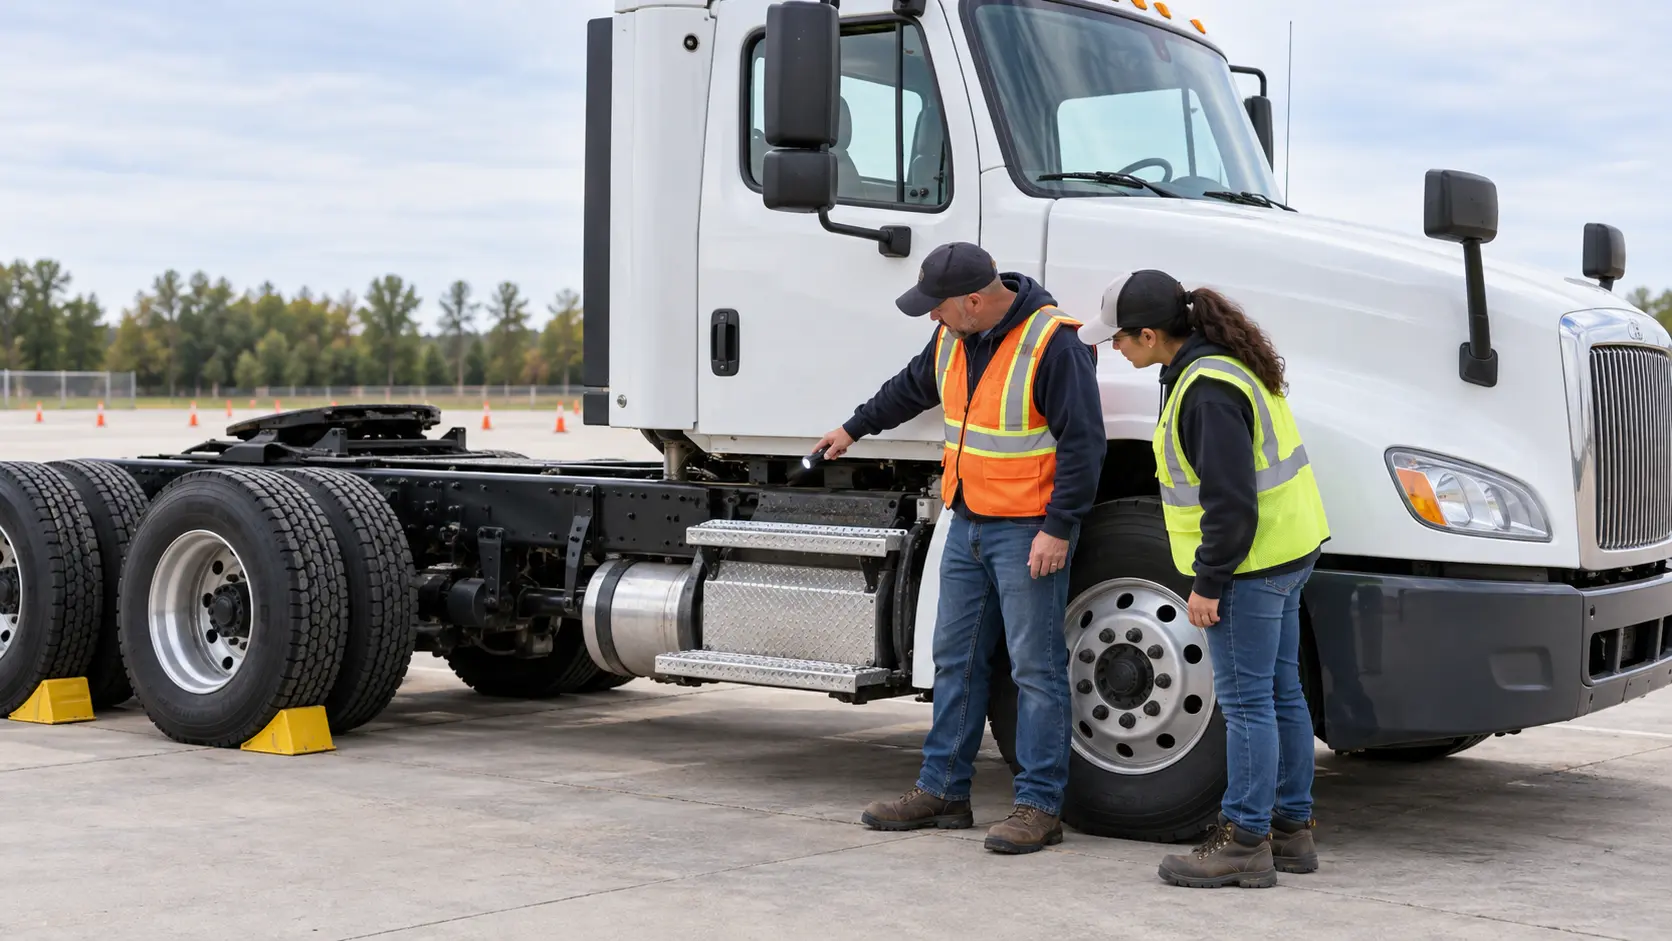
A commercial truck can look clean and road-ready while a structural problem is developing below the cab, along a frame rail, or at a body mount. That is why a useful CDL inspection does more than glance at paint and body panels. The driver builds a deliberate view of the vehicle's load-carrying structure, checks the components that connect the cab and body to that structure, and reports anything that is cracked, loose, sagging, broken, distorted, missing, or unable to operate normally.
Why the frame-and-cab check matters
Separate observation from diagnosis
A driver can observe a fresh crack line, a missing bolt, an uneven gap, a loose bracket, a sagging door, a hood that will not latch, or a bumper that moves. A driver usually cannot determine the remaining strength of a rail, certify a weld, or decide that a distorted flange is acceptable. Good inspection language stays within the first category. It identifies the component and location, describes the condition, and routes the vehicle to a qualified decision-maker.
Think in systems, not isolated parts
A frame concern may sit beside suspension hangers, steering components, fuel tanks, air lines, electrical harnesses, or the fifth wheel. If the truck has suffered a yard strike or road impact, the visible dent may not be the only issue. Follow the carrier's inspection and reporting process and check the adjacent areas you are trained and authorized to view. For a refresher on nearby components, use the steering and suspension inspection plan and the fuel and exhaust inspection plan.
The federal baseline and Pennsylvania test context
What 49 CFR 393.201 says about frames
The current federal rule is direct: the frame or chassis of a commercial motor vehicle must not be cracked, loose, sagging, or broken. Bolts or brackets securing the cab or body to the frame must not be loose, broken, or missing. The regulation also addresses rail flanges between the axles: they may not be bent, cut, or notched unless the manufacturer specifies otherwise. Welding parts to the frame and welded frame repairs must follow the vehicle manufacturer's recommendations, and drilling the top or bottom rail flanges is restricted unless specified by the manufacturer. Read the rule itself at .
What 49 CFR 393.203 adds
The cab-and-body rule covers components a driver can often check without special equipment. Entrance and exit doors or their parts may not be missing or broken; doors may not sag so severely that they cannot be opened or closed properly, and they generally may not be wired or otherwise fixed shut so they cannot be readily opened. The rule repeats the requirement for secure cab or body mounting bolts and brackets, requires the hood to be securely fastened, and requires seats to be securely mounted. It also prohibits a missing, loosely attached, or dangerously protruding front bumper. The full text is available at .
How Pennsylvania frames the test
PennDOT's modernized CDL materials explain that the vehicle inspection test focuses on safety-critical items and requires the applicant to name, point to or touch, and fully explain what is being inspected. The manual also states that applicants will not have to crawl under the vehicle. That test format is not the limit of an employer's operational inspection program, and PennDOT expressly notes that the CDL test does not cover every federal inspection guideline. Follow examiner instructions during the test and the school's or carrier's approved procedure everywhere else. The current resources are linked from PennDOT's .
Prepare the vehicle and your inspection path
Secure the truck before looking closely
Use a level, designated inspection area whenever possible. Apply the parking brake, place the transmission as instructed, shut down or manage the engine according to the approved inspection sequence, and use wheel chocks when required by the test site, employer, or training procedure. Keep the ignition key and vehicle status under control. Do not reach near moving parts, hot surfaces, or a raised cab or hood unless the correct securement and procedure are in place.
Choose a consistent route
Begin at the front corner and work along one side of the cab to the frame behind it, then repeat on the other side. Use a flashlight for shadows, but do not insert your hands into hidden spaces. View the inside and outside of each rail from safe standing or crouching positions available to you. A consistent route prevents the familiar side from receiving all the attention while the less visible side is skipped.
Inspect the frame rails and crossmembers
Scan the rail, then inspect likely stress points
First step back and look at the rail as a long line. It should not appear sagged, twisted, or displaced. Then move closer and inspect visible web and flange areas, crossmember connections, brackets, and fasteners. Pay special attention around suspension hangers, engine and transmission supports, fifth-wheel structures, body mounts, and areas with previous work or fresh impact marks. Look for crack lines, separation, broken material, missing hardware, elongated holes, shiny movement marks, or rust trails coming from a fastener joint.
Do not scrape, hammer, pry, drill, or load a component to “test” it. Such actions can damage the truck and do not substitute for qualified inspection. If a suspected line is hidden by coating or grime, record the precise location and request evaluation. A flashlight angle can sometimes distinguish a shadow from a surface line, but it cannot certify the underlying metal.
Treat flanges and unauthorized modifications carefully
The upper and lower edges of a frame rail are flanges. Federal rules specifically restrict bending, cutting, notching, welding, and drilling in defined frame areas unless the manufacturer's specifications or recommendations allow the work. A student does not need to memorize every approved chassis modification. The safe skill is recognizing an unusual hole, notch, weld, plate, or bent flange and reporting it without guessing that it is factory-approved.
Check cab and body mounts
Locate the mounting points
Ask an instructor to identify the cab mounts on the specific training vehicle. Their design and visibility vary. Once located, inspect the brackets, bushings or isolators, bolts, nuts, retaining hardware, and nearby metal that you can see. The legal focus is simple: bolts or brackets securing the cab or body to the frame must not be loose, broken, or missing. Your observation should also note obvious displacement, separation, or contact between parts that normally have clearance.
Look for evidence of movement
A missing fastener is clear. Looseness can be subtler: a backed-off nut, a shifted washer, polished metal where parts have rubbed, a rust trail, a bracket sitting away from its mating surface, or a bushing that appears displaced. None of these signs authorizes a roadside repair. State what is visible: “left rear cab-mount bracket has a visible gap and rust trail at the lower fastener,” not “the cab mount is definitely failing.”
Inspect doors, hood, seats, and bumper
Doors must open, close, and remain usable
Inspect hinges, latches, handles, seals, and the visible door structure. Open and close the door using the normal handle if the site procedure permits, keeping three points of contact when entering or exiting. The door should not be missing or broken, sag so that it cannot operate properly, or be secured closed in a way that prevents ready opening. Do not dismiss a difficult latch as cosmetic; report sticking, sagging, broken hardware, or a door that will not stay closed.
The hood must fasten securely
Check both hood latches or restraints as equipped and verify the hood is seated and secured after any engine-compartment inspection. A latch that appears connected but does not hold, a broken cable or strap, cracked mounting area, or mismatched side-to-side closure needs attention. Never drive merely because the hood's weight seems likely to keep it down.
Seats and the front bumper belong in the same review
From the cab, check that the driver's seat is securely mounted; inspect other seats as required by the vehicle and procedure. Excessive movement at the base, missing mounting hardware, or a damaged adjustment lock should be reported. Outside, confirm the front bumper is present, securely attached, and not protruding in a hazardous way. An impact to the bumper should also prompt a careful view of nearby mounts, hood alignment, lights, and steering-area components.
Review body panels, steps, and attachments
Distinguish cosmetic damage from an unresolved safety question
A paint scuff may be cosmetic, but location and context matter. A fresh scuff beside a shifted bracket, uneven door gap, or loose bumper creates a different question. Do not make the decision by appearance alone. Trace the area to its attachment points, compare both sides, and report the combination of observations. If the condition follows an impact, the carrier's collision or maintenance procedure may require inspection even when the truck still moves normally.
Turn observations into safe actions
The table below is a communication guide, not a repair authorization. Company procedures, qualified maintenance, and applicable regulations control the final disposition.
| Observation | Useful report language | Safe next action |
|---|---|---|
| Fresh line across a frame rail near a bracket | “Visible line approximately two inches long on the left rail web beside the forward suspension bracket; appears fresh and needs evaluation.” | Stop the inspection sequence, mark the exact location, and refer the vehicle to qualified maintenance before operation. |
| Cab-mount fastener missing or bracket separated | “Right rear cab-mount bracket has one missing fastener and a visible gap at the frame connection.” | Do not improvise hardware. Report through the carrier or instructor and keep the vehicle out of service pending a qualified decision. |
| Door drops and will not latch normally | “Driver door sags when opened and requires lifting to latch; hinge area shows movement.” | Report the unusable entrance/exit and related mounting condition; do not wire or strap the door shut. |
| Unfamiliar weld or drilled flange hole | “Welded plate and drilled hole visible on lower rail flange behind the cab; approval is unknown.” | Request documentation and manufacturer-qualified review rather than assuming the modification is acceptable. |
| Surface rust with no obvious crack or distortion | “Surface corrosion visible on crossmember; no crack or displacement seen from the accessible view, but area should be monitored under maintenance policy.” | Record accurately and follow the employer's corrosion-assessment process; do not declare structural strength. |
| Loose front bumper after minor contact | “Left bumper corner moves at its bracket after reported yard contact; nearby hood gap differs side to side.” | Report the impact and related observations; obtain inspection before the vehicle is returned to service. |
Worked scenario: a mark after a yard contact
A student approaches a training tractor that another driver lightly contacted with a yard barrier the previous afternoon. The note says the right front bumper was touched and no road trip occurred afterward. The bumper has only a shallow scuff, so it would be easy to call the event cosmetic. Instead, the student secures the truck, begins at the right front corner, and follows the normal inspection path.
Step 1: identify the visible facts
The student sees the scuff, then compares the bumper brackets on both sides. The right bracket appears slightly separated from its mounting surface and one washer shows a fresh shiny edge. The bumper moves when checked only in the manner authorized by the instructor. The right hood gap also looks narrower than the left, although both hood latches close.
Step 2: expand the view without making a diagnosis
The student looks at the accessible frame area behind the bumper, the nearby cab and hood mounting areas, the right step, and the door operation. No crack is visible from the safe standing view, the door opens and closes normally, and the step is secure. The student does not crawl under the truck, remove the bumper, tighten hardware, or conclude that the rail is straight.
Step 3: make a precise handoff
The report states: “Previous right-front yard contact documented. Right bumper bracket has a visible gap at its mounting surface, washer has a fresh movement mark, bumper moves at that corner, and hood gap is narrower on the right. No frame crack visible from accessible standing view; further inspection required.” The instructor removes the tractor from the lesson lineup and sends it through the school's maintenance process. This is a successful inspection even though the student did not identify the repair: the student found and communicated an unresolved safety condition before driving.
Practical frame-and-cab checklist
Use this list to organize practice; the vehicle, employer, examiner, and jurisdiction may require additional items.
- Park in an approved area, apply the parking brake, place the transmission as instructed, and chock wheels when required.
- Review any driver report, repair note, impact history, or out-of-service tag before starting.
- Walk both sides and look at the frame as a complete line for sagging, twisting, displacement, cracks, looseness, or broken material.
- Inspect accessible rail webs, upper and lower flanges, crossmembers, brackets, and fasteners.
- Report unfamiliar holes, cuts, notches, welds, plates, or repairs; do not assume they are manufacturer-approved.
- Check visible cab and body mounts for loose, broken, missing, shifted, or separated hardware.
- On straight trucks, continue along accessible body supports and cargo-floor structure.
- Open and close entrance doors normally; inspect hinges, latches, handles, and sagging.
- Confirm the hood is seated and securely fastened after the engine-area check.
- Check that the driver's seat and required passenger seats are securely mounted.
- Inspect the front bumper for presence, secure attachment, and hazardous protrusion.
- Check steps, handholds, fairings, boxes, covers, and nearby attachments for secure mounting.
- Look for contact with tires, steering or suspension components, fuel or air lines, wiring, and exhaust parts.
- Compare both sides when a gap, angle, or mounting position looks unusual.
- Describe the component, side, location, condition, and context in the report.
- Stop and escalate when a condition is uncertain; never diagnose structural strength or improvise a frame repair.
Common inspection mistakes
Calling every mark a crack
Seams, coating edges, dirt tracks, and scratches can resemble cracks. Use light and viewing angle, but do not turn uncertainty into certainty. “Suspected line requiring evaluation” is more useful than a confident but unsupported diagnosis. Equally, do not erase the concern with “probably paint” when the location and context deserve inspection.
Inspecting only the visible outside face
The outer rail is easy to see, while inner faces, bracket connections, and the opposite side are easier to skip. Use every safe view the approved procedure provides. If access is insufficient, say so. Never compensate by reaching blindly or positioning your body beneath an unsecured vehicle.
Tightening first and reporting later
A loose fastener can be evidence of movement, damaged threads, a failed bracket, or an incorrect part. Tightening it may hide the evidence and may require a specified torque or replacement procedure. Preserve the condition, identify the location, and let qualified maintenance decide the repair.
Treating an inspection script as the entire standard
A memorized CDL script helps organize the test, but the real vehicle varies. Learn what the words mean and where the components are on the truck in front of you. PennDOT warns that the skills-test inspection does not cover every federal inspection guideline. Operational drivers also follow carrier procedures and the broader pre-trip responsibility. The post-trip and DVIR handoff guide can help connect the walkaround to clear written reporting.
Build the skill during CDL training
Practice location, condition, and action
For each component, practice a three-part explanation: identify the location, state the unacceptable conditions, and explain the action if a defect is found. Example: “This is the left frame rail behind the cab. I inspect it and its visible connections for cracks, looseness, sagging, breaks, distortion, and missing hardware. If I see a suspected structural defect, I report the exact location and do not operate the vehicle until it is evaluated under the approved process.”
Frequently asked questions
Can a CDL student crawl under the truck to inspect the frame?
Not during Pennsylvania's CDL vehicle inspection test. PennDOT says the applicant will not have to crawl under the vehicle. In training or at work, stay within the method authorized by the instructor, employer, and site. Never place yourself under a vehicle unless it has been secured and the task is being performed under an approved safe-work procedure.
Does surface rust mean a truck frame is unsafe?
Surface discoloration alone does not let a driver determine structural condition. The practical question is whether there is cracking, looseness, sagging, broken material, severe section loss, distorted flanges, damaged fasteners, or another condition that needs qualified evaluation. Describe what you can see and escalate uncertainty instead of diagnosing the metal from color alone.
Can a cracked commercial-truck frame be repaired by welding?
A driver should not improvise or approve that repair. Under 49 CFR 393.201, parts and accessories may be welded to the frame only in accordance with the vehicle manufacturer's recommendations, and any welded frame repair must also follow those recommendations. A reported crack belongs with qualified maintenance and the carrier's repair process.
Should the frame and cab be rechecked after body or collision repair?
Yes. A careful post-repair handoff should confirm the affected frame, cab and body mounts, doors, hood, bumper, steps, adjacent lines, wiring and fasteners before the vehicle returns to service. The driver still completes the normal pre-trip inspection and reports anything loose, misaligned, damaged, or different from the documented repair.