Getting your air brake test practice down cold is your golden ticket to passing the CDL exam and, more importantly, being a safe driver. This isn't about just memorizing a script. It's about mastering a sequence of hands-on drills and truly understanding what’s happening with your truck's most critical safety system. When you practice correctly, you build the confidence and muscle memory to perform perfectly, even with an examiner watching your every move.
Why Nailing the Air Brake Test Is So Critical
Passing the air brake test isn’t just about getting your license—it’s proof that you have the skills to safely operate a massive vehicle. This part of the CDL exam confirms you know how the system works, how to spot trouble before it turns into a disaster, and what to do if things go wrong on the road. It’s the absolute foundation of being a professional driver.
Think of the air brake system as the lungs of your truck. Every single component has to work together seamlessly to generate the massive stopping power needed for a heavy vehicle. Even a tiny, undetected leak or a sticky valve can lead to catastrophic failure.
Understanding the Core Components
To really ace your air brake test practice, you have to know the why behind every step. That all starts with understanding the main players in the system:
- Air Compressor: This is the heart of the whole operation. It’s usually driven by the engine and is responsible for pumping air into the storage tanks.
- Air Reservoirs (Tanks): These tanks are where the compressed air is stored, ready to be used the moment you hit the brake pedal. Most trucks have several tanks.
- Brake Chambers: These are the workhorses. They take the compressed air and turn it into mechanical force, which then pushes on the slack adjusters to apply the brakes.
- Gladhands: These are the quick-connect couplings that link the air lines from your tractor to the trailer. They're essential for making sure the trailer brakes work in sync with the tractor.
If any one of these parts fails, you're in a dangerous spot. For example, a bad compressor means no air pressure, and eventually, no brakes. This is exactly why the practical test is so thorough; it makes you prove you can find these problems in the yard, not when you’re barreling down the highway.
The written test takes this knowledge a step further. It typically has about 25 questions focused entirely on air brake systems. You'll need to answer at least 20 of them correctly—that's an 80% passing score—to move on. The time you get varies by state. This knowledge is a key part of the larger transport chain of responsibility, which holds everyone, including the driver, accountable for vehicle safety.
For drivers looking to upgrade their license, if you currently have an automatic-only restriction, learning these systems is also part of the process. You might find our information on the https://patriotcdl.com/e-restriction-removal-course/ helpful.
Before we dive into the step-by-step drills, let's break down what the knowledge test covers at a high level.
Air Brake Test at a Glance
This table gives you a quick snapshot of the key areas you'll be tested on and why they are so vital for every professional driver to know inside and out.
| Component | What It Is | Why It's Critical |
|---|---|---|
| Air Compressor | The engine-driven pump that creates air pressure for the brake system. | Without a working compressor, the entire system fails. No air, no brakes. |
| Governor Cut-In/Cut-Out | The device that controls when the compressor pumps air (cut-in) and when it stops (cut-out). | Ensures the system maintains the correct pressure range (typically 100-125 psi). |
| Static & Applied Leak Tests | Tests to check for air loss when the brakes are released (static) and applied (applied). | Detects leaks that could drain your air supply and cause brake failure. |
| Low Air Warning System | A light and buzzer that activate when air pressure drops to a dangerous level (around 60 psi). | This is your last-ditch warning to pull over safely before the brakes fail. |
| Spring Brakes | Mechanical brakes that engage automatically when air pressure is too low. | A critical safety feature that stops the vehicle if the air system fails completely. |
Understanding these five pillars is non-negotiable. They form the core of both the written questions and the hands-on inspection you'll perform for the examiner.
The air brake test is more than a procedure; it's a safety philosophy. Mastering it proves you are not just a driver, but a professional operator who takes responsibility for your vehicle, your cargo, and everyone else on the road.
Getting Hands-On: The Pre-Trip Air Brake Inspection Drill
Alright, this is where the rubber meets the road—or in this case, where your knowledge meets the air brake system. The pre-trip air brake inspection isn't just about going through a list of steps. It's a performance. You're showing the examiner that you're a safe, competent professional who knows their truck inside and out.
The goal here isn't to be fast; it's to be smooth, confident, and deliberate. We're going to build the muscle memory and the verbal script you need to nail this. This drill covers everything from your initial checks inside the cab to getting out and physically inspecting components like slack adjusters and brake chambers. Master this flow, and you'll walk into your test ready to impress.
The diagram below gives you a simple, big-picture view of how an air brake system works. Air gets generated by the compressor, stored in tanks, and then used to stop the vehicle.
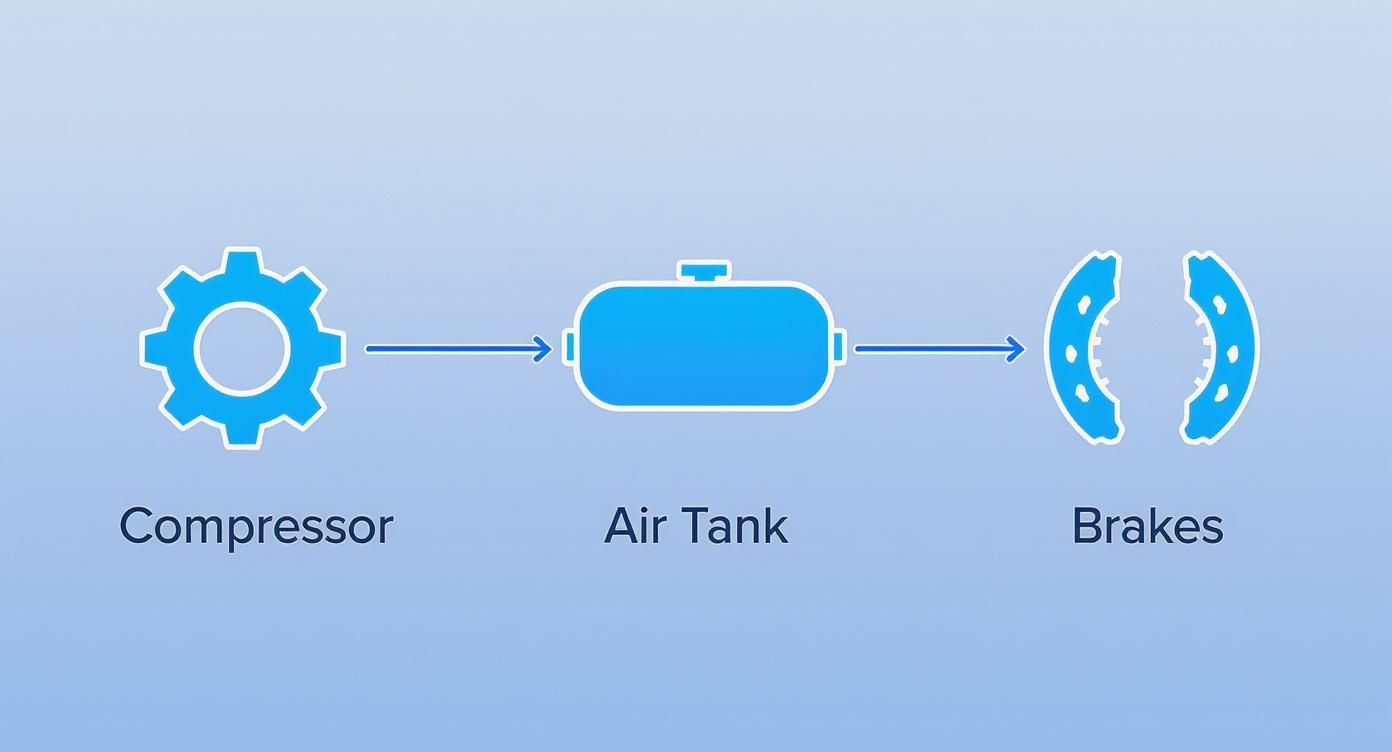
This is why every single part of the test is so important. A problem anywhere along this chain—from the compressor to the reservoirs to the brake lines—means you might not be able to stop when it counts.
The Initial Setup: What to Do and Say First
Before you touch a single button, you need to set the stage. The examiner is watching you from the second you get in the truck, and your first moves show them you take safety seriously.
First things first: make sure your truck is on level ground and chock the wheels. This is a critical safety step, and forgetting it can be an automatic fail. It's an easy point to lose under pressure. Once you're in the cab, buckle up, ensure the parking brake is set, and put the transmission in neutral.
Now, you start talking. Say it clearly for the examiner to hear: "My vehicle is safely chocked, the parking brake is set, and the transmission is in neutral." Announcing this shows you're consciously following the proper safety procedures.
Testing the Governor Cut-In and Cut-Out
Time to build air pressure and prove your system's governor knows when to work and when to rest. Turn the key to the "on" position (don't start the engine yet) and check that your ABS light illuminates and then turns off. Now, go ahead and start the engine.
As the pressure builds, you need to narrate what you're doing. A solid script sounds like this: "I'm now building air pressure to check the governor cut-out, which should happen between 120 and 140 PSI." Let the pressure climb until you hear that classic "pssh" sound of the governor cutting out. As soon as it does, look at your primary and secondary gauges and call out the exact PSI.
Next up is the governor cut-in. You'll need to fan the brake pedal to slowly bleed air out of the system. Tell the examiner what you're doing: "I am now fanning the brakes to lower the air pressure. I'm waiting to confirm the governor cuts back in, which should happen at or above 100 PSI." Keep your eyes glued to those gauges and listen for the compressor to kick back on. The moment it does, announce the PSI.
Pro Tip from the Field: Don't just read the numbers off the gauge. Physically point to the needle as you state the pressure. This simple action connects your words to your actions and leaves no doubt in the examiner's mind that you know what you're looking at.
Static and Applied Air Leakage Tests
These two tests trip a lot of people up, but they're simple once you get the rhythm down. First is the static leak test. With your air system fully charged (at cut-out pressure), turn the engine off. Then, release the parking brake (push the yellow knob in) and wait a moment for the system to settle.
Once the needles on your gauges are still, start a one-minute timer. The rule here is simple: you can't lose more than 2 PSI for a straight truck or 3 PSI for a combination vehicle. Verbalize it: "I am now starting a one-minute static air leak test. I should not lose more than 2 PSI."
When the minute is up, announce your result. Right after that, you'll move into the applied leakage test. This is a huge safety check. For this test, press the brake pedal down firmly and hold it. Once the gauges stabilize again, start another one-minute timer. Announce what you're doing: "I am now performing the applied air leak test for one minute. I should not lose more than 3 PSI for a straight truck or 4 PSI for a combination vehicle."
After the minute passes, state your pressure loss clearly. Remember, if you were to lose more than 4 PSI in a combination vehicle during this test on the road, it would signal a dangerous leak that needs immediate repair. This sequence is just one piece of the comprehensive safety check you'll perform, which you can read about in our full guide to the CDL pre-trip inspection.
Nailing the In-Cab Air Brake Checks
Alright, you've handled the initial governor and leakage tests. Now comes the part that really separates the pros from the rookies: the in-cab air brake performance. Think of this as your moment on stage. The examiner isn't just checking boxes; they're listening to your every word and watching your every move to see if you truly understand what's happening with that air system.
This is where you prove you know the truck’s warning and safety systems inside and out. Your confidence here speaks volumes. Let's walk through the three big tests—applied leakage, low air warning, and the spring brake pop-out—and I'll tell you not just what to do, but exactly what to say to impress your examiner.

The Applied Leakage Test
Your engine is off, the system is fully charged, and you've just wrapped up the static leak test. It’s time to check for leaks under pressure, just like you would if you were holding the truck on a hill.
Get ready, press the service brake pedal down firmly, and hold it. You'll see the air gauges dip and then settle. Don't rush this part.
Once those needles are steady, tell the examiner exactly what you’re doing. Say it clearly: “I am now starting my one-minute applied air leakage test. For this combination vehicle, I should not lose more than four PSI in one minute.” (Remember to say three PSI if you're in a straight truck).
Now, hold that pedal steady for a full 60 seconds. A little tip from the road: get comfortable before you start the clock. The minute is up—check your gauges and announce the outcome: "After one minute, I did not lose more than four PSI. The applied leakage test is complete and passed."
The Low Air Warning Test
Next up is the low air warning system. This is a life-or-death feature, so the examiner will be paying close attention. The engine is still off, but you'll need to turn the key to the "on" or "accessory" position to power up the dashboard.
Announce your plan: "I will now fan the brake pedal to lower the air pressure and test the low air warning light and buzzer."
Start pumping the brake pedal with smooth, steady presses. This isn't a race. You're bleeding air out of the system, so watch those gauges like a hawk and listen for the alarm.
The warning light and buzzer have to come on at or above 55 PSI. The instant they do, stop fanning and call it out: "My low air warning light and buzzer came on at approximately 60 PSI. This is above the minimum requirement of 55 PSI, so the system is working correctly."
A classic mistake is pumping the brake too fast and blowing right past the number. You'll look flustered and unsure. Use deliberate, controlled pumps and keep your eyes glued to those gauges.
The Spring Brake Pop-Out Test
This is the grand finale of your in-cab checks. You're about to confirm that your emergency braking system—the spring brakes—will engage automatically if you lose too much air.
From where you left off, keep fanning the brake pedal down. As you do, let the examiner know what's coming: "I'm continuing to fan the brakes down to test the spring brake pop-out. The parking brake knob should pop out between 20 and 45 PSI."
Keep an eye on that yellow parking brake knob while you pump. You'll see it and probably hear it when it pops out. The moment it does, look at your air pressure and announce the reading. For instance: "The parking brake knob popped out at approximately 30 PSI, which is safely within the 20 to 45 PSI range. My spring brakes are working as they should."
This three-part sequence is the heart of the in-cab air brake inspection. Once you’ve nailed these steps, you'll start the engine, build your air pressure back up, and move on to the final tug tests. Get this flow down cold in your air brake test practice, and you'll be well on your way to passing that CDL exam.
How to Tackle the Written Air Brake Knowledge Test
Passing the hands-on inspection is a huge milestone, but you're not done yet. Before you ever get in the truck with an examiner, you have to nail the written air brake knowledge test. This exam is all about making sure you understand the why behind the how—from knowing your system components cold to having critical safety numbers memorized.
Think of it this way: the written test is the blueprint for your practical skills. Knowing why the governor cuts out around 120 PSI or how much "brake lag" really affects your stopping distance makes your hands-on checks more than just a routine. It's the difference between just following a script and truly understanding your rig's most important safety system.
Mastering Key Topics and Tricky Questions
The written air brake test usually has about 25 questions, and the magic number for passing is typically 80% or higher. The questions are laser-focused on a few core areas that you absolutely must know inside and out.
Here’s what you can expect to see:
- System Components: You’ll need to identify parts like the air compressor, reservoirs, brake chambers, and slack adjusters, often from a diagram or a simple description.
- PSI Ranges: This is non-negotiable. The test will ask about the governor cut-in/cut-out pressures, when the low air warning should come on, and at what pressure the spring brakes will engage.
- Safe Braking: Expect questions on controlled braking, snubbing on long downgrades, and brake lag. They want to see that you can manage your brakes safely out on the road.
Watch out for the tricky questions. They often present two answers that look almost identical. For instance, a question might ask what the air compressor governor controls. The right answer is when the compressor starts and stops pumping air. A wrong answer might be the speed of the compressor or the pressure you apply with your foot. These little details are where a lot of people get tripped up.
The written test isn't about just memorizing answers; it's about understanding the concepts. When you truly grasp why the low air warning has to activate above 55 PSI, you'll never forget the number.
The PSI Numbers You Must Memorize
There’s just no getting around it—you have to know your numbers. These values are critical for both your written test and the in-cab inspection.
Here’s a quick reference guide to the key PSI numbers you need to burn into your memory.
Common Air Brake System Pressure Ranges
| System Check | Acceptable PSI Range or Limit | What It Means |
|---|---|---|
| Governor Cut-Out | 120-140 PSI | The pressure at which the compressor stops pumping air. |
| Governor Cut-In | At or above 100 PSI | The pressure at which the compressor starts pumping air again. |
| Low Air Warning | At or above 55 PSI | The minimum pressure before the warning light and buzzer must activate. |
| Spring Brake Pop-Out | 20-45 PSI | The pressure range where the parking brake knob will pop out, engaging the spring brakes. |
| Static Leakage Limit | Less than 3 PSI/minute (combination) | The maximum allowable air loss with brakes released and engine off. |
| Applied Leakage Limit | Less than 4 PSI/minute (combination) | The maximum allowable air loss with the brake pedal held down. |
Treat this table like a set of flashcards. These aren't just test answers; they're the vital signs of your truck's braking system.
A Smarter Way to Study
Simply reading the CDL manual cover to cover and hoping the information sticks isn't the best strategy. You need a more active approach to lock this stuff in. The drivers who do best are the ones who combine book knowledge with practical application and testing.
This is where online resources can be a huge help. Taking a bunch of different practice exams is one of the single best things you can do. Our series of air brakes practice tests is designed to give you a feel for the real thing, helping you pinpoint exactly where you need more review.
Here’s the pro tip: every time you get a question wrong, don’t just look at the right answer and move on. Dig back into the manual and figure out why you missed it. That’s how you turn a mistake into a learning moment and make sure it doesn’t happen on test day.
Common Mistakes That Cause an Automatic Fail
Knowing what not to do is just as important as knowing what to do. When you're practicing for the air brake test, remember the examiner is looking for a safe, competent driver. Some mistakes aren't just a few points off your score—they're test-enders.
I've seen countless students walk in feeling confident, only to get tripped up by one simple, avoidable error that brings everything to a screeching halt. Let's walk through these common landmines so you can sidestep them on test day.
Forgetting Basic Safety Protocols
Your safety mindset is on display before you even turn the key. The most basic and surprisingly common mistake is failing to chock the wheels. A commercial vehicle that starts to roll is a huge deal, and examiners have zero tolerance for it.
Forgetting this step isn't just a simple slip-up; it tells the examiner you lack fundamental safety awareness. They will likely end the test right then and there.
Pro Tip: Make chocking the wheels the absolute first thing you do. As you do it, say it out loud: "I am now safely chocking the wheels." This not only helps you remember but also clearly communicates your safety-first approach to the examiner.
Another quick way to fail is starting the test without ensuring the truck is in neutral and the parking brake is set. These initial actions prove you're in control of the vehicle from the get-go.
Mixing Up the In-Cab Test Sequence
The in-cab air brake check isn't just a random list of tasks; it's a logical sequence. Getting the steps out of order shows you've memorized motions without understanding the why behind them, which is a major red flag for any examiner. A classic example is trying the low air warning test before the leakage tests.
The whole point is to test the system from a fully charged state down to empty. Think of it this way:
- Governor Cut-In/Cut-Out: First, make sure the system builds and maintains pressure correctly.
- Static & Applied Leakage Tests: Then, check if it can hold that air without leaks.
- Low Air Warning Test: Next, confirm the alarms work as the pressure drops.
- Spring Brake Pop-Out Test: Finally, verify the emergency brakes engage as the last line of defense.
Jumbling this sequence suggests you might not be able to diagnose a real-world problem on the road. This knowledge is also crucial for your written exam, so it pays to truly understand the system. You can get more practice with our CDL general knowledge test resources.
Exceeding PSI Loss Limits
The leakage tests are black and white—you either pass or you fail. The numbers are non-negotiable. For the applied leakage test on a combination vehicle, you absolutely cannot lose more than 4 PSI in one minute. If that needle drops 5 PSI, your test is over.
There's no wiggle room here because a significant leak is a catastrophic failure waiting to happen. The examiner needs to see that you can not only perform the procedure but also recognize when the system has failed the test.
To nail this, press the brake pedal firmly and hold it steady for the full minute. A common mistake is starting the clock before the air gauge needle settles. A shaky foot can also make it look like you have a leak. Get comfortable, apply firm pressure, and don't start your timer until everything is stable. Practice holding that pedal until it feels like second nature.
Your Air Brake Test Questions Answered
Even after countless hours practicing the air brake sequence, it's totally normal to have some last-minute jitters. Let's tackle some of the most common questions and concerns I hear from drivers, giving you straight answers so you can walk into that test with confidence.
Is There a Strict Time Limit for the Test?
This is a big source of stress for a lot of people, but you can breathe a little easier. There isn't a separate, ticking clock just for the air brake portion of the exam. It's simply one part of your overall pre-trip inspection time.
Generally, you'll have about 30 to 45 minutes for the entire pre-trip, but this can vary by state and even by the examiner. What they're really looking for is accuracy and a thorough, safe procedure, not breakneck speed. The goal is to be smooth and efficient, which comes naturally with practice. A calm, methodical pace shows confidence far better than rushing ever will.
What if I Forget a Step During the Inspection?
It happens. The key is how you recover. Forgetting a minor point might just cost you a point on your score. But, missing a critical safety item—like checking the low air warning—is a completely different story and could be an automatic fail.
If you suddenly realize you skipped something, don't panic. Just stay cool and confidently tell the examiner, "You know what, I need to go back and verify the governor cut-in pressure." Most examiners will appreciate that you caught your own mistake. It shows you know what you're doing. The best way to avoid this scenario, of course, is to drill the sequence until it's pure muscle memory.
Think of the air brake test as an open-book exam, but the "book" is your hands-on knowledge of the truck. If you realize you skipped a chapter, just have the confidence to go back and read it out loud for the examiner.
Do I Really Need to Memorize All the PSI Numbers?
Yes. This is non-negotiable. Knowing your pressure ranges is absolutely critical for passing both the practical skills test and the written exam. These numbers are the vital signs of your brake system, and you have to be able to rattle them off without hesitation.
Make sure you know these key figures cold:
- The low-air warning must come on at or above 55 PSI.
- The spring brakes (parking brake valve) must pop out between 20-45 PSI.
- The governor should cut-out (stop pumping air) between 120-140 PSI.
You also have to know the air loss limits for the leakage tests. For a combination vehicle, for instance, you can't lose more than 4 PSI in one minute during the applied test. There’s no wiggle room here; you have to be precise.
Can I Bring a Checklist to the Test?
Sorry, but no. You can't use any notes, manuals, or cheat sheets during your official CDL skills test. The examiner needs to see that you have the entire pre-trip inspection, including the full air brake sequence, committed to memory.
This is exactly why all that repetition is so important. You're trying to burn the process into your brain so you can perform the steps automatically while explaining what you're doing. To help lock it all in, try quizzing yourself with resources like our second air brakes practice test, which is great for reinforcing the details.
At Patriot CDL, we turn practice into perfection. Our expert instructors guide you through every step of the air brake test and more, ensuring you have the skills and confidence to pass your CDL exam and launch your career. Get the hands-on training you need to succeed at https://patriotcdl.com.