A good hazmat endorsement study guide does more than just throw regulations at you; it breaks a pretty complex process down into clear, manageable chunks. When you really get into it, earning this endorsement boils down to three main hurdles: meeting the initial requirements, acing a specialized knowledge test, and passing a federal security screening.
This is a must-have certification for any serious commercial driver who wants to haul hazardous materials. More importantly, it’s your ticket to some of the best-paying jobs in the industry.
Starting Your Hazmat Endorsement Journey
Adding a hazmat endorsement to your CDL is a major step up in a professional driving career. It immediately opens doors to more specialized—and usually much better-paying—loads. But before you bury your head in the books, it’s smart to get a bird's-eye view of the entire process, from the first application to the final stamp of approval.
First things first, you have to make sure you're even eligible. This goes beyond just being a safe driver; it’s about meeting strict federal standards put in place to protect the public. The two biggest deal-breakers are age and licensure. You absolutely must be at least 21 years of age and already hold a valid Commercial Driver's License (CDL) in your home state.
If you need a refresher on the basics, you can find a good breakdown of what it takes to get your commercial license on our site.
The Application and Security Screening
Once you've ticked off the basic eligibility boxes, you'll move into the formal application and a very important security check. The U.S. government doesn't hand these endorsements out lightly, and for good reason. A huge piece of the puzzle is the Transportation Security Administration (TSA) threat assessment.
This involves filling out an online application, getting your fingerprints taken, and paying a fee of $86.50. This isn't just paperwork; the TSA performs a thorough background check to look for any potential security red flags. You can generally expect this to take up to 60 days to complete.
The whole process can feel like a lot, so here’s a quick overview to help you keep track of where you are and what’s next.
Hazmat Endorsement Process Overview
| Phase | Key Requirement or Action | Important Details to Know |
|---|---|---|
| Eligibility | Confirm Age and CDL Status | You must be 21+ and hold a valid CDL for your state. |
| Security Screening | TSA Threat Assessment | Submit an online application, get fingerprinted, and pay the $86.50 fee. |
| Study & Preparation | Master the Hazmat Manual | Focus on placard rules, loading/unloading, and emergency response. |
| Knowledge Test | Pass the Written Exam | This is a specialized test separate from the standard CDL exams. |
| Endorsement Issued | Receive Your New CDL | Once you pass the test and the TSA clears you, your state will issue your updated license. |
As you can see, it's a step-by-step journey. Nail one part, then move on to the next.
This infographic lays out the core phases of the journey in a visual way, from hitting the books to getting that official endorsement on your license.
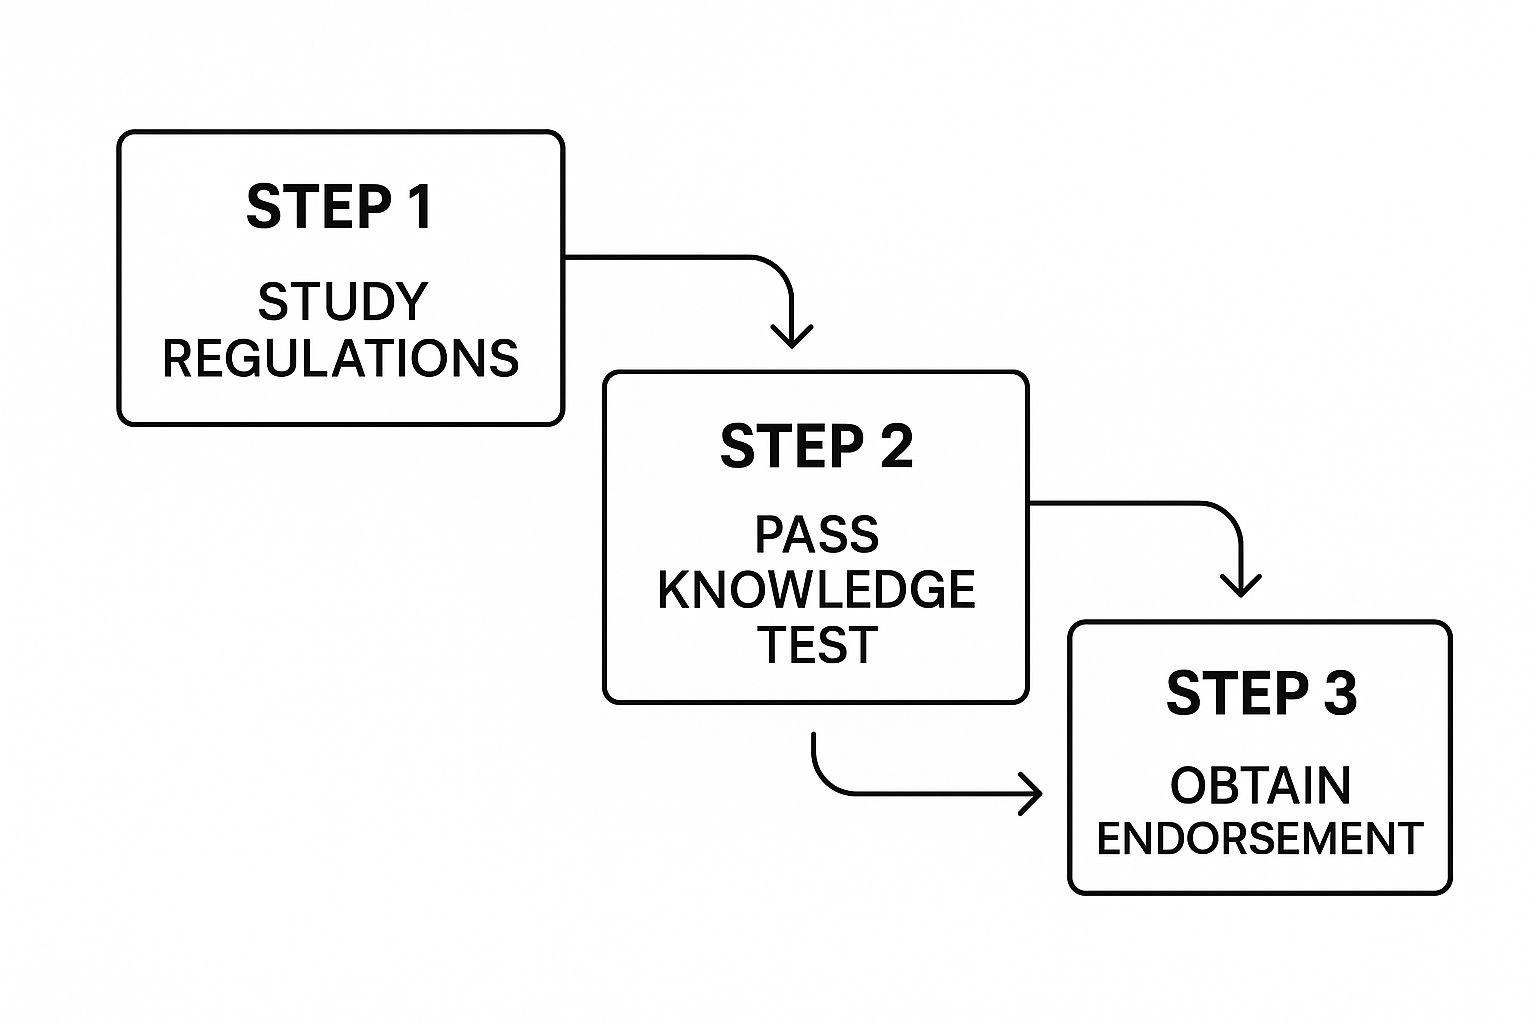
It’s a clear path: study hard, pass the test, and then you’re officially endorsed.
Why This Endorsement Matters
Getting the H endorsement is about so much more than just adding a letter to your license. Think of it as a direct investment in your future earning power. It sends a clear signal to employers that you're a responsible, well-trained professional who can be trusted with sensitive cargo.
The ability to transport hazardous materials significantly expands your job prospects. Many of the highest-paying freight categories, such as chemicals, fuel, and other industrial materials, are off-limits without it.
This specialization immediately makes you a more valuable driver in the logistics world. Companies are always on the hunt for qualified drivers to move these essential goods, and they'll pay a premium for the confidence that comes with hiring someone who is properly endorsed. By going through this process, you’re not just following the rules—you’re setting yourself up for a more secure and profitable career on the open road.
Getting to Grips with Hazmat Rules and Communication
The heart and soul of your hazmat test—and your life on the road with these loads—is the federal Hazardous Materials Regulations (HMR). This isn't just about memorizing rules from a book. It's about deeply understanding a communication system built to keep everyone safe, from you in the cab to the public and first responders.
This safety system is a three-legged stool: shipping papers, placards, and container markings. As the driver, you're the last line of defense. You are legally responsible for making sure these three things match up perfectly before you even think about putting the truck in gear. It’s a non-negotiable part of the job.
How to Decode the Hazardous Materials Table
The most critical tool you have is the Hazardous Materials Table, straight from the federal regulations. Think of it as your secret decoder ring for everything hazmat. It contains the official, legally binding information for every single regulated material out there.
While you don't have to memorize the whole thing for the test (thankfully!), you must know how to read it and pull the right information. It gives you the proper shipping name, the hazard class, the UN/NA identification number, and the specific placards needed for that load. This table is the ultimate source of truth. If the shipper's paperwork doesn't align with what this table says, you have a major issue that needs fixing before you go anywhere.
The Nine Classes of Hazardous Materials
The HMR neatly sorts all hazardous materials into nine distinct classes based on the type of danger they present. Getting these classes straight in your head is vital because it immediately tells you what kind of risk you're dealing with.
- Class 1 Explosives: This is stuff that goes boom. Think dynamite, fireworks, or ammunition.
- Class 2 Gases: Covers everything from flammable propane to non-flammable helium and poisonous anhydrous ammonia.
- Class 3 Flammable Liquids: Your everyday gasoline and ethanol fall here. They ignite easily.
- Class 4 Flammable Solids: These are materials that might ignite from simple friction or become dangerous when they get wet.
- Class 5 Oxidizers & Organic Peroxides: These substances produce oxygen, which can make fires burn hotter and more violently.
- Class 6 Toxic & Infectious Substances: This is the nasty stuff—poisons, blood samples, and anything that can make people sick.
- Class 7 Radioactive Materials: Anything that gives off radiation, from medical isotopes to nuclear waste.
- Class 8 Corrosives: Think strong acids or bases that can eat through steel or burn skin on contact.
- Class 9 Miscellaneous: A catch-all category for materials like lithium batteries or dry ice that have unique hazards not covered elsewhere.
Knowing these categories helps you anticipate the real-world dangers. For example, if you see you're hauling a Class 5 Oxidizer, you know instantly that keeping it far away from flammable materials is a top priority.
Placards and Shipping Papers: Your Core Responsibility
When you arrive to pick up a hazmat load, your most important task is to play detective. You have to verify the paperwork against the actual freight and placards. The shipping papers are your starting point, but you must confirm every detail. They need to list the UN/NA ID number, the proper shipping name, the hazard class, and the packing group.
Next, you walk the trailer and cross-reference that info with the placards. If the papers say "Gasoline, 3, UN1203," you need to see a red placard with a big "3" and "1203" on it. No exceptions.
This check isn't just a good idea—it's your legal duty as the driver. If you find any discrepancy, like a wrong placard, incomplete shipping papers, or a damaged container, you do not move that truck. The first thing you do is get on the horn with the shipper and get it corrected.
Think of it just like a pre-trip inspection, but for your cargo. You wouldn't hit the interstate with bad brakes, and you shouldn't hit it with bad hazmat paperwork either.
To help you get familiar, here’s a look at some of the most common placards you'll encounter on the road. This table is perfect for making flashcards as you work through your study plan.
Common Hazmat Placards and Their Meanings
| Placard | Hazard Class | Primary Danger |
|---|---|---|
| Red "FLAMMABLE" with a "3" | Class 3 | Indicates a flammable liquid that can easily ignite from a spark or heat source. |
| Yellow "OXIDIZER" with a "5.1" | Class 5 | Signifies a substance that can release oxygen, intensifying fires or causing explosions. |
| White "POISON" with a "6" | Class 6 | Warns of a toxic substance that can cause serious harm or death if inhaled, ingested, or touched. |
| Black & White "CORROSIVE" with an "8" | Class 8 | Denotes a material, like an acid, that can destroy skin tissue and corrode steel. |
This clear, visual communication system is what makes it possible to safely transport millions of tons of hazardous materials across the country every single year. And as the driver, you are the most important person in making sure that system works.
Mastering Safe Loading and Transport Procedures
Handling hazardous materials is a huge responsibility that goes way beyond just driving the truck. In my experience, the most critical moments—and the ones where things can go wrong fast—happen when the vehicle is standing still during loading and unloading. Any good hazmat endorsement study plan has to hammer these procedures home, because they're a huge part of the official test and your everyday reality.
Getting your cargo secured isn't just about stopping a load from shifting. It's about preventing a potential disaster. Every single container, whether it's a 55-gallon drum or a massive portable tank, comes with its own set of rules for how it needs to be braced, blocked, and tied down. An unsecured valve or a drum that can slide around isn't just sloppy—it's a serious violation waiting to be written up.
The Critical Rules of Load Segregation
One of the first and most important things you have to get right is load segregation. Simply put, you cannot load certain types of hazardous materials together. Think of your trailer as a chemistry experiment on wheels; mixing the wrong substances can have explosive, toxic, or corrosive consequences. The federal regulations give you a detailed Segregation Table that is your bible for what can and cannot ride in the same vehicle.
For instance, you would never load Class 1 Explosives next to Class 8 Corrosives. It's a recipe for disaster. The corrosive material could eat through the packaging of the explosives, creating an incredibly dangerous situation that puts everyone at risk.
Your shipping papers will give you the first clue, but the Segregation Table is the law. Before a single pallet gets on that truck, you must confirm that everything in the shipment is compatible. Making a mistake here is one of the fastest ways to get hit with a severe violation.
This isn't just a suggestion. It's a core safety rule that protects you, the public, and the freight you're hauling. Always, always check the table.
Securement That Goes Beyond the Basics
Securing a hazmat load is a whole different ballgame than tying down general freight. The goal is to make sure those containers can't move in any direction—up, down, forward, backward, or side-to-side. This takes a lot more finesse than just tossing a few straps over the top.
- Bracing: This means using lumber or other approved materials to build a solid wall against the freight, stopping it from moving forward or backward.
- Blocking: This involves wedging blocks or chocks around the base of the cargo to keep it from sliding across the trailer floor.
- Tie-downs: This is where you use straps, chains, or other certified devices to lock the cargo firmly to the structure of the trailer itself.
Let's take a load of compressed gas cylinders. They absolutely must be transported standing upright and secured in racks or boxes designed to keep them from falling over or banging into each other. Laying them down or letting them roll loose is strictly forbidden. A big part of your study time should be spent memorizing the specific securement rules for different types of containers.
Protocols for Loading and Unloading
The moments you're actually loading or unloading are when you, your truck, and the materials are at their most vulnerable. The feds have very strict rules for these activities, and you'll need to know them inside and out for your test.
One of the biggest ones is the attendance rule. When you’re dealing with certain high-risk materials, like explosives or flammable liquids, a qualified person has to be "attending" the vehicle the entire time. This means you have to be awake, alert, within 25 feet of the cargo, and have a clear, unobstructed view. You can't kick off the process and then wander off to grab lunch.
The person attending also has to know exactly what to do in an emergency and be able to get to the fire extinguishers immediately. This constant vigilance is what stops small problems from turning into big ones.
Before You Start the Engine
After the last piece of cargo is loaded, don't even think about putting the truck in gear until you've done one last, critical walk-around. This isn't your standard pre-trip inspection; this is a dedicated hazmat check.
| Action Item | What to Look For | Why It Matters |
|---|---|---|
| Check All Closures | Make sure every valve, cap, and lid on every container is screwed on tight. | An open or loose valve can lead to a slow leak or a major spill on the highway. |
| Inspect for Leaks | Look for any drips, weird stains, or fumes coming from your cargo. | Catching a leak before you move prevents a rolling emergency. |
| Confirm Securement | Yank on the straps. Check your blocking and bracing. Is everything still tight? | Cargo can settle during loading. A final check ensures it's truly road-ready. |
| Verify Placards | Are the correct placards on all four sides of your trailer? Are they clean and visible? | Proper placarding is your main way of telling first responders what they're dealing with. |
Passing your hazmat test means knowing these procedures by heart. While a regular CDL proves you can operate the vehicle, the H endorsement proves you have the specialized smarts to manage the cargo itself. If you’re just getting started and need to lock down your commercial learner’s permit first, you can find the info you need to get your permit before diving into endorsements. Nailing that first step is key before you tackle the world of hazmat.
What to Do When Things Go Wrong: Emergencies and Security
When you're hauling hazardous materials, you're not just a driver; you're the first line of defense. Preparing for the worst isn't just about being cautious—it’s a core responsibility of the job. Your hazmat endorsement study guide prep needs to cover more than just loading rules; it must dive deep into reacting to emergencies and spotting security threats.
If a leak, spill, or crash happens, your immediate actions can be the difference between a minor incident and a public safety disaster. This is where your training truly counts.
Your Best Friend in a Crisis: The ERG
Every truck carrying placarded hazmat is required to have the latest edition of the Emergency Response Guidebook (ERG). Think of this book as your most critical tool when everything goes sideways. It’s designed for quick, clear answers under pressure.
Your first job in an emergency is to whip out the ERG and identify the material and its dangers. You can look it up by its name or, more commonly, by the four-digit UN/NA number found on the shipping papers or placard. The ERG will point you to a specific guide page.
That single page gives you the crucial, need-to-know info for the first few minutes:
- Potential Hazards: It spells out the immediate risks—fire, explosion, and health dangers.
- Public Safety: It gives you initial isolation distances and recommends how far to evacuate people for spills or fires.
- Emergency Response: It details what first responders should do, including how to fight the fire and apply first aid.
Knowing how to flip through that ERG in a hurry isn't just a good skill; it's a lifesaver. Practice with it. Time yourself looking up different chemicals until you can find the right guide page in seconds.
Your Role in an Emergency
If an incident occurs, your responsibilities follow a clear, logical order. First, protect yourself. Always. If you can act without putting yourself in harm's way, your next job is to protect the public and call for help.
Your immediate goal is to stop the situation from escalating. This could mean moving the rig to a safer spot (if it's safe to do so) or hitting the emergency shut-offs on a tanker. You must also keep people away from the scene and actively warn anyone approaching of the danger.
Once you’ve contained what you can, you need to report the incident. You’ll be the main source of information for dispatch and first responders, so be ready to provide:
- Your name and your carrier’s name.
- The exact location of the incident.
- What happened (e.g., spill, fire, collision).
- The material's proper shipping name, hazard class, and UN/NA number.
- The amount of material on your truck.
Staying calm and providing clear, accurate information in that first call is one of the most professional things you can do. It gives responders the intel they need to show up with the right gear and the right plan.
Staying Vigilant: Security Threats and Awareness
Beyond accidents, hauling hazmat comes with serious security risks. The TSA requires all hazmat drivers to complete security awareness training for a reason, and you can bet it's on the endorsement test.
The scale of hazmat transportation is massive. At the end of 2022, the U.S. had 763,867 interstate freight carriers. A specific slice of those—93,838 carriers, or about 12.3% of the total—are authorized to haul hazardous materials. That's a lot of sensitive cargo on the road, which is why the TSA threat assessments and knowledge tests are so strict.
Your carrier will have a security plan, and you need to know your part inside and out. This means understanding who to call if you see something suspicious and what security measures you should be taking on the road.
A huge part of your job is just paying attention. Be on the lookout for red flags: someone watching your truck too closely, asking strange questions about your cargo, or trying to mess with your vehicle. Never leave a loaded truck unattended in an unsecured spot. Always lock it up, and if you can, park it in a secure, well-lit yard.
Ultimately, handling emergencies and security threats is all about solid preparation and a professional mindset. This section of your hazmat endorsement study guide isn't just about passing the test—it's about becoming a driver who can be trusted to protect their cargo, their community, and themselves.
Proven Strategies to Ace the Hazmat Test
Knowing the regulations is a huge part of the puzzle, but it's not the whole game. To actually walk out of the DMV with a passing grade on your hazmat test, you need a smart approach. This isn't about late-night cram sessions; it's about building test-taking muscle and getting inside the head of the people who write the questions.
The hazmat test is no joke. You're typically looking at around 30 multiple-choice questions, and the passing score is a steep 80%. Do the math—that means you can only miss about six questions. With a margin for error that thin, every single point counts.
Don't Just Read—Engage With the Material
I've seen countless drivers fail because their only prep was passively reading the hazmat manual. Highlighting a few pages just isn't going to cut it. You have to actively engage with the material, turning those dense regulations into something your brain can grab onto under pressure.
One of the most effective things you can do is make your own flashcards. It sounds old-school, but the physical act of writing down the information helps lock it into your memory.
- For Placards: Draw the placard on one side. On the other, list its hazard class, division, and the primary danger (e.g., "Class 3, Flammable Liquid, Fire Hazard").
- For Regulations: Turn rules into questions. For instance, "What's the attendance rule for Division 1.1 explosives?" on the front, with the detailed answer on the back.
- For Acronyms: Put "ERG" on one side and "Emergency Response Guidebook – Used by first responders" on the other.
This forces your brain to retrieve information, which is a much more powerful learning tool than simply reading it over and over.
Make Practice Tests Your Best Friend
If there's one silver bullet for preparing for this test, it's taking practice tests. They do more than just tell you what you know; they train you to spot question patterns and manage your time. Look for practice tests that don't just give you the right answer but also explain why it's right.
It's not enough to know the correct choice. You need to understand precisely why the other options are wrong. This is how you develop the confidence to eliminate bad answers quickly, even on questions where you aren't 100% sure.
When you take a practice test, treat it like the real deal. Turn your phone off, set a timer, and don't cheat. When you're done, spend twice as much time reviewing the questions you got wrong as the ones you got right. Every mistake is a signpost pointing to a gap in your knowledge.
Breaking Down Real-World Questions
Let's dissect a couple of typical questions to see how this works in practice. This will help you get into the right mindset for analyzing the options you'll see on test day.
Sample Question 1:
You are transporting a shipment that requires placards. When must you stop before crossing a railroad track?
A. You are not required to stop if you see a green light.
B. Within 50 feet, but not less than 15 feet from the nearest rail.
C. At least 100 feet before the crossing.
D. Only if you are hauling more than 1,000 lbs of hazardous materials.
Analysis:
The only correct answer here is B. The federal regulations are incredibly specific about this stopping distance. Option A is a trap; a green light never overrides this rule for placarded loads. C is the wrong distance, and D is also wrong because the rule applies to any placarded vehicle, regardless of weight.
Sample Question 2:
Your shipping papers for a hazmat load must be kept:
A. In a locked glove compartment.
B. In a pouch on the driver's side door or on the driver's seat.
C. In the sleeper berth.
D. Filed away in your trip binder.
Analysis:
The correct answer is B. Think about it from an emergency responder's perspective. They need those papers immediately. The law states they must be within your reach while you're wearing your seatbelt. A door pouch or the seat itself are the only logical places. Locking them up or putting them in the sleeper makes them useless in a crisis.
This focus on immediate access and safety is a core theme in all trucking regulations. It's the same kind of thinking you need for the broader exams, a topic you can brush up on with our guide to the CDL general knowledge test.
By consistently drilling with questions like these and picking apart the logic, you'll build the sharp thinking and confidence needed to pass on your first try.
Common Questions About the Hazmat Endorsement
Even with a detailed study plan, you're bound to have some questions as you get ready for the hazmat endorsement test. It’s completely normal. Let’s tackle some of the most common things drivers ask so you can move forward with confidence.
How Much Does the Hazmat Endorsement Cost?
The final price tag can shift a bit depending on your state, but you can plan on a few core expenses. The biggest one you'll face is the TSA Threat Assessment, which currently runs $86.50. This fee covers the cost of your fingerprinting and the comprehensive background check.
On top of that, your local DMV will have its own set of fees for the written knowledge test and for issuing a new CDL with the "H" endorsement printed on it. These are usually pretty reasonable, often falling somewhere in the $15 to $30 range for each. When you add it all up, you should expect your total investment to be somewhere between $100 and $130.
How Long Is a Hazmat Endorsement Good For?
Getting your hazmat endorsement isn't a one-and-done deal. Because of the serious security protocols involved, your endorsement is only valid for a maximum of five years. The key thing to remember is that your H endorsement's expiration date is directly linked to your TSA security threat assessment. When one expires, so does the other.
This means that when it's time to renew, you have to go through the full TSA screening all over again. You'll submit new fingerprints and pass another background check. It's smart to get a head start on this, as the full renewal process can take up to 60 days.
Does the Hazmat Endorsement Transfer to Other States?
This is a big one for drivers who move. Your hazmat endorsement is only valid in the state that issued your CDL—your official state of residence. If you pack up and establish residency in a new state, you’ll have to transfer your CDL, and that means re-qualifying for your H endorsement there.
More often than not, this involves repeating a few steps. Most states will make you pass their version of the hazmat knowledge test and get a new TSA background check before they'll add the endorsement to your new license.
It's crucial to check the specific requirements of the state you are moving to. Don't assume the process is the same everywhere. A quick call to the new state's DMV can save you a lot of time and headaches.
If you have specific questions about navigating a state-to-state transfer or just want to make sure you're on the right track, our team can help you sort it out. You can easily reach out to us for guidance and get the answers you need.
Is the Hazmat Endorsement Worth It Financially?
For most drivers, the answer is a resounding yes. Earning your hazmat endorsement almost always opens the door to higher pay. It qualifies you for more specialized, in-demand freight that a huge chunk of the driver pool can't legally touch.
The extra pay you earn reflects the added responsibility and in-depth knowledge required. As of mid-2025, data shows the average hourly wage for a hazmat-endorsed driver is about $27.67, which works out to an average annual salary of around $57,554. For the most experienced drivers in high-demand roles, earnings can climb as high as $83,500 per year.
That significant pay bump makes the initial investment in the fees and study time totally worth it. It’s one of the clearest paths to increasing your value as a professional driver and giving your career earnings a serious boost.