Getting your hazmat endorsement isn't just about passing another test—it's one of the smartest career moves you can make in trucking. It’s a direct investment in your professional future that seriously boosts your paycheck and job security. This hazmat study guide is designed to give you the practical knowledge you need to ace the exam and understand why this certification is so valuable. Think of it as upgrading your standard CDL to a specialist qualification, opening doors to better-paying, more stable jobs.
Why A Hazmat Endorsement Means A Bigger Paycheck
Adding that 'H' endorsement to your CDL is a surefire way to climb the career ladder and earn more money. It tells every potential employer that you're not just another driver; you have specialized skills and can be trusted with sensitive, high-risk cargo. Right away, you stand out from the crowd.
This distinction is a big deal. Our entire supply chain depends on the safe movement of critical materials—everything from the fuel in our cars and the chemicals used in manufacturing to essential medical supplies. Companies are always looking for reliable, certified drivers to handle these loads, and they are absolutely willing to pay a premium for that peace of mind.

The Numbers Don't Lie
The financial upside is clear and immediate. Getting a hazmat endorsement isn't just an extra credential; it's a direct route to earning significantly more than the average trucker.
For example, a Class A CDL driver with a hazmat tanker endorsement can expect their average total pay to jump to around $75,680 annually. That extra pay isn't for nothing—it reflects the added responsibility and the specialized knowledge the job demands.
That kind of pay bump makes the study time and effort a fantastic return on investment. Plus, the skills you develop make you a more valuable asset to any company, which translates to better job security for the long haul. Understanding all the CDL requirements is your first step toward locking in these career benefits.
More Than Just Money: Better Job Opportunities
A higher salary is great, but the hazmat endorsement also throws open the doors to a much wider range of career opportunities. It qualifies you for jobs you couldn't even apply for before, making your career far more versatile and resilient.
You'll suddenly be a top candidate for jobs in absolutely essential industries, like:
- Fuel Transportation: Keeping gas stations and airports running.
- Chemical Hauling: Moving the raw materials that factories need to operate.
- Environmental Services: Transporting hazardous waste for proper, safe disposal.
- Agricultural Support: Delivering fertilizers and other vital chemicals to farms.
The endorsement is also a major advantage if you're interested in specialized fields like marine transportation careers, where handling dangerous goods is a routine part of the job. Earning this certification isn't just about getting a license; it’s about building a more secure and prosperous future for yourself on the road.
Decoding The 9 Hazmat Classes And Placards
At the very core of handling hazardous materials is knowing the nine distinct hazmat classes. You can think of them as a universal language for danger, spoken through the colors, symbols, and numbers on those diamond-shaped placards you see on trucks.
Getting this right isn't just about passing the test. It's about safety—yours, and everyone else's on the road. Each class lumps materials together based on their primary threat, whether it's the risk of explosion, fire, or something else entirely. Mastering these is the first real step to hauling hazmat with the confidence of a pro.
Let's break down what each class means in the real world.
The Foundation: Classes 1-3
We’ll start with the heavy hitters. The first three classes cover some of the most volatile stuff you can legally haul. They're all about things that can explode or catch fire, so knowing them inside and out is non-negotiable.
Class 1: Explosives – This one is exactly what it sounds like. We're talking about dynamite, ammunition, and fireworks. The danger is obvious: they go boom.
Class 2: Gases – This class is a bit more complex, with three sub-divisions. You've got flammable gases like propane, non-flammable gases like oxygen, and poisonous gases like chlorine. The risk here isn't just fire; it's also high-pressure containers that can rupture or toxic fumes you can't see.
Class 3: Flammable Liquids – This is a common one. Think gasoline, diesel, and paint thinner. The big danger is their low flashpoint, which means even a small spark can set them off.
Middle-Tier Hazards: Classes 4-6
Next up are materials that are dangerous under specific conditions or pose serious health risks. Their hazards might not be as explosive as Class 1, but they are every bit as serious if mishandled.
The Department of Transportation (DOT) doesn't just make these rules up. Every classification is the result of serious testing and data on how a substance acts during transport. Your job is to respect that classification every single time.
Knowing what’s in your trailer is just as important as knowing your truck is safe to drive. It actually changes how you approach your daily checks, much like a good guide to the pre-trip inspection ensures your rig is mechanically sound before you turn the key.
Class 4: Flammable Solids – These aren't liquids, but they burn just as fiercely. This group includes things that can spontaneously combust (catch fire just from being exposed to air) or materials that are dangerous when wet (they react with water to create a flammable gas).
Class 5: Oxidizers & Organic Peroxides – You can think of these as fire accelerants. Oxidizers provide a ton of oxygen, making other materials burn hotter and faster. Organic peroxides are often unstable and can react dangerously to heat or even a hard bump.
Class 6: Poisons (Toxic) & Infectious Substances – This class is all about what happens if these materials get into your body. It covers toxic stuff that's deadly if swallowed or inhaled, plus infectious materials like medical waste that carry diseases.
The Final Group: Classes 7-9
The last three classes cover a unique range of hazards, from the invisible threat of radiation to things that can damage the environment. They might seem less common, but they demand specialized knowledge and extreme care.
Class 7: Radioactive Materials – This is for anything containing radionuclides. The risk here is radiation exposure, which is why these are some of the most tightly regulated loads on the road.
Class 8: Corrosives – These are chemicals that can eat through steel or cause severe chemical burns to skin. We're talking about strong battery acids and industrial cleaners.
Class 9: Miscellaneous Hazardous Materials – This is basically the "catch-all" category. If a material is hazardous but doesn't neatly fit into the other eight classes, it lands here. This includes things like lithium batteries, dry ice, and certain chemicals that are harmful to the environment.
So, how do you keep them all straight? This quick-reference table should help.
The 9 Official Hazmat Classes At A Glance
This table gives you a bird's-eye view of each class, its placard color, and some everyday examples. Use it as a quick refresher while you study.
| Class Number | Hazard Name | Common Examples | Placard Color |
|---|---|---|---|
| 1 | Explosives | Dynamite, ammunition, fireworks | Orange |
| 2 | Gases | Propane, oxygen, chlorine | Red, Green, White |
| 3 | Flammable Liquids | Gasoline, diesel fuel, alcohol | Red |
| 4 | Flammable Solids | Magnesium, sulfur, phosphorus | Red & White Stripes |
| 5 | Oxidizers & Organic Peroxides | Ammonium nitrate, hydrogen peroxide | Yellow |
| 6 | Poisons & Infectious Substances | Pesticides, arsenic, medical waste | White |
| 7 | Radioactive Materials | Uranium, plutonium | Yellow & White |
| 8 | Corrosives | Sulfuric acid, sodium hydroxide | Black & White (split) |
| 9 | Miscellaneous Hazardous Materials | Lithium-ion batteries, dry ice, asbestos | Black & White Stripes |
Learning to instantly recognize these nine classes by their placard is a foundational skill. It's the visual shorthand that screams "danger" from a distance, and it forms the very bedrock of your duties as a hazmat-endorsed driver.
How To Read The Hazardous Materials Table
Think of the Hazardous Materials Table (HMT), found in 49 CFR 172.101, as your master key for everything hazmat. The first time you see it, it can look like an intimidating wall of codes, numbers, and names. But it's actually a perfectly organized tool that, once you understand it, gives you every critical piece of information you need in seconds.
This table is the single source of truth for transporting any hazardous material safely and legally. It tells you the material's official name, its specific dangers, which placards to use, and any special handling rules you absolutely must follow. Getting comfortable with this table is non-negotiable for passing your test and being a safe driver.
The entire process boils down to a simple workflow: classify the material using the table, figure out the right placard, and then check the regulations for any specific instructions.
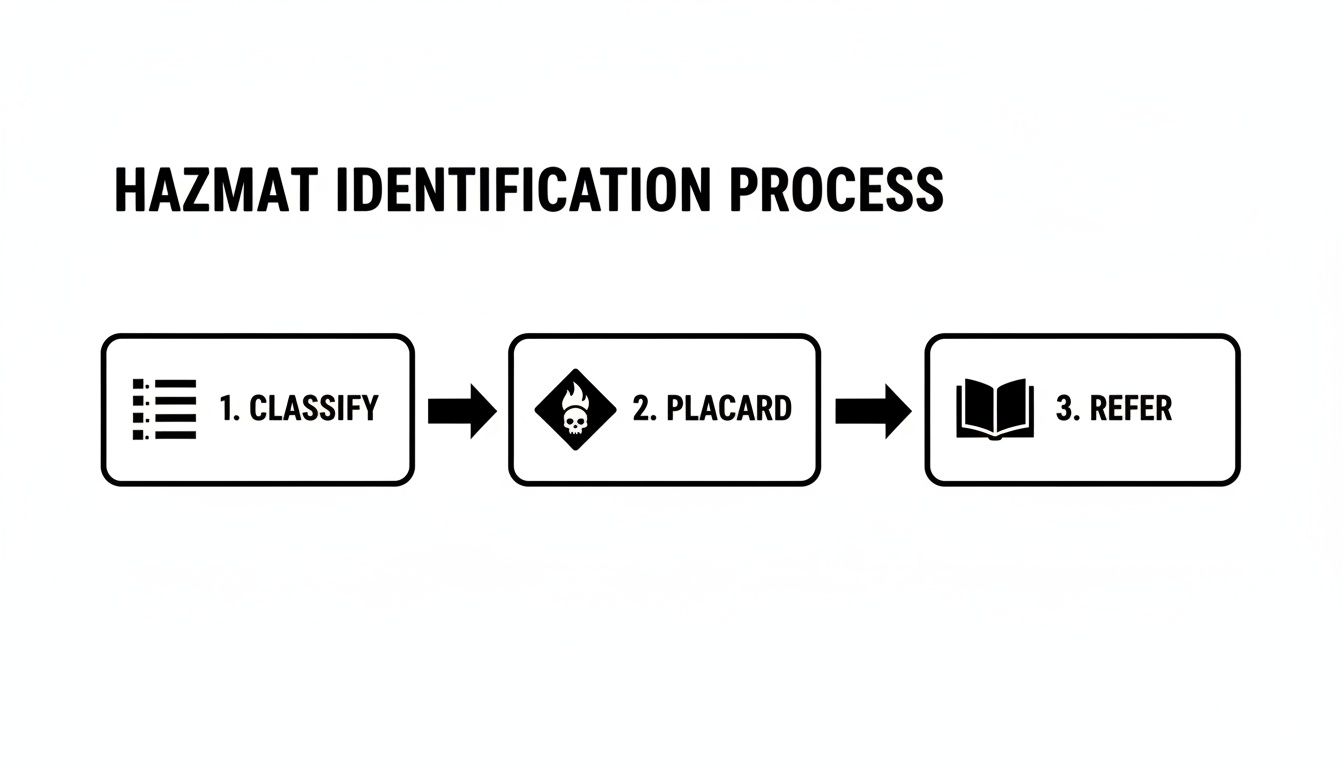
As you can see, the HMT is the starting point. Everything else, from placarding your truck to loading the freight, comes after you've consulted it.
Breaking Down The Columns
The HMT has ten columns, and each one gives you a different piece of the safety puzzle. While you won't use every column on every load, there are a handful you'll turn to every single time. These are the ones you need to know cold.
Let’s focus on the columns that are absolutely essential for your test and for your day-to-day work on the road:
- Column 1 (Symbols): This column is for red flags. Special symbols here point out unique rules. For example, an "A" means the material is only regulated if you're hauling it by aircraft, while a "W" means it's only regulated for transport by water.
- Column 2 (Proper Shipping Name): This is the material's official, legal name. You must use this name—exactly as it's written—on all shipping papers. No nicknames, no shortcuts.
- Column 3 (Hazard Class/Division): This tells you which of the nine hazard classes the material falls into. Is it a Class 3 Flammable Liquid or a Class 8 Corrosive? This column has the answer.
- Column 4 (UN/NA ID Number): This is the universal four-digit code for the substance. You'll see this number displayed on placards and shipping documents.
- Column 5 (Packing Group): Marked with Roman numerals (I, II, or III), this tells you the degree of danger. Packing Group I is for the most dangerous materials, II signifies medium danger, and III means minor danger.
A Practical Example Step-By-Step
Let's make this real. Imagine your shipping papers list a load of "Acetone" and you need to verify the details.
- Locate the Proper Shipping Name: First, you’ll scan down Column 2 alphabetically until you land on "Acetone."
- Identify the Hazard Class: Now, just look across that same row to Column 3. You'll see it’s a Class 3 material (Flammable Liquid).
- Find the UN/NA ID Number: Keep moving across the row to Column 4, which shows its ID number is UN1090. That’s the number you’ll see on the placards for an Acetone shipment.
- Determine the Packing Group: Next up is Column 5, where you'll find Packing Group II. This tells you it poses a medium level of danger.
- Check for Special Provisions: Column 7 is where you'd look for any special rules. It lists codes that point to other sections in the regulations, so you’d need to look those up to see if any extra steps are required.
The key to the HMT isn't just memorizing facts; it's about learning the process. Whether you're dealing with Acetone or Sulfuric Acid, the steps are identical: find the name, then read across the row to get the full picture.
This skill is a building block for your entire career. Just like you need a strong foundation for the CDL general knowledge test, mastering the HMT is what makes you a true professional who can handle hazardous materials with confidence. With a little practice, using this table will become second nature.
Your Two-Week Hazmat Study Plan For Success
Let's be real: trying to cram for the hazmat endorsement test the night before is a recipe for disaster. This isn't about memorizing a few facts; it's about building a solid foundation of knowledge, piece by piece. The best tool you have is a structured plan.
This two-week schedule breaks down all the dense material into manageable daily goals. Think of it as your roadmap to success, designed to help you learn and actually retain the information without feeling like you're drowning in regulations.

Week One: Building The Foundation
Your first week is all about getting the fundamentals down cold. Nail these core concepts, and the rest of the puzzle will start to fall into place. We’re focusing on the big-picture items that form the backbone of every hazmat rule.
Days 1-2: Focus on Classes and Placards: Your mission for the first two days is simple: learn the nine hazard classes until they're second nature. Get some flashcards and drill them—class number on one side, name and a quick placard description on the other. You should be able to identify them in your sleep.
Days 3-4: Master the Hazardous Materials Table: Now it's time to get friendly with the HMT. Don't try to memorize it; learn how to use it. Each day, pick five to ten different materials and practice looking them up. Find the proper shipping name, UN/NA number, hazard class, and packing group for each one.
Days 5-6: Understand Shipping Papers and Security: The focus now shifts to paperwork and safety protocols. Dive into what's required on shipping papers and get a handle on security plan requirements. This includes knowing the rules for en route security and who needs a formal plan. For a deeper look, check out the essentials of ADR preparation to see how these concepts apply globally.
Day 7: Review and Reinforce: End the week with a practice quiz covering everything you've learned so far. This is your chance to find any weak spots and go back to the manual to shore them up.
Week Two: Application and Refinement
With a solid foundation in place, week two is where you start applying that knowledge to real-world scenarios. This is about connecting the dots between the regulations on paper and the situations you'll face on the road.
It's important to know that since February 2022, the FMCSA has mandated Entry Level Driver Training (ELDT) for anyone seeking an H endorsement. This ensures new drivers master everything from general awareness to function-specific skills before taking the knowledge test. Patriot CDL's accelerated programs are built around this, getting you road-ready in as little as three weeks.
A good study plan is your best defense against test-day anxiety. Knowing you've systematically covered all the material gives you a powerful sense of confidence that cramming can never match.
Here’s your plan for the final push:
Days 8-9: Loading, Unloading, and Segregation: It's time to get practical. Spend these days studying the segregation table—this is crucial for knowing which hazard classes absolutely cannot be loaded together. Also, review the rules for blocking, bracing, and properly securing hazmat cargo. Understanding these rules is also key for drivers looking into our E-Restriction Removal Course.
Days 10-11: Emergency Response and Incidents: This section is non-negotiable. You have to know what to do when things go wrong. Study the procedures for responding to leaks and spills, and memorize the emergency response information you must have in your cab. Learn how to use the Emergency Response Guidebook (ERG)—it’s your best friend in an incident.
Days 12-14: Full-Length Practice Tests: Dedicate your final few days to taking full-length practice exams. Time yourself to get a feel for the real test environment. For every single question you miss, go back to the manual and figure out why you got it wrong. Don't just memorize the right answer; understand the concept behind it. This final step is what locks in the knowledge for good.
Practice Questions That Mirror The Real Exam
Knowing the rules is one thing, but applying them when the pressure is on is a completely different ball game. The absolute best way to get ready for the real hazmat test is to work through practice questions that look and feel just like the ones you'll face on exam day. This isn't about memorizing answers; it's about training your brain how to think through the problems.
Let's dive into some realistic practice questions pulled straight from the topics in this guide. I won't just give you the right answer—I'll walk you through the why behind it, breaking down the logic so you truly understand the concepts. This is how you build the confidence to walk in and ace the test.
Question 1 Placarding Requirements
When must a vehicle be placarded for carrying hazardous materials?
A) Only when carrying more than 5,000 pounds of any single hazardous material.
B) Any amount of a material listed in Table 1 of 49 CFR 172.504.
C) Only for materials in Class 1 (Explosives) and Class 7 (Radioactive).
D) When the aggregate gross weight of all hazardous materials in Table 2 exceeds 500 pounds.
The placarding rules aren't one-size-fits-all. The regulations split materials into two different tables, and that distinction is what tells you when a placard is absolutely mandatory.
Correct Answer: B
Explanation: The regulations are crystal clear on this point. While most hazardous materials (those found in Table 2) only require placarding when you're hauling 1,001 pounds or more, anything from Table 1 needs a placard, period. It doesn't matter if it's one pound or a thousand.Why? Table 1 materials are the most dangerous substances out there—think certain high-hazard explosives or poison gases. Even a tiny amount is a major risk. Option A is wrong (the threshold is 1,001 lbs, not 5,000), C is too limited, and D gets the weight wrong.
Question 2 Shipping Paper Information
Which of the following is NOT required to be on a hazardous materials shipping paper?
A) The driver's name and CDL number.
B) The proper shipping name of the material.
C) The UN/NA identification number.
D) The hazard class of the material.
Correct Answer: A
Explanation: You, the driver, are responsible for those shipping papers, but your personal info like your name or CDL number doesn't actually go on the document. The Feds require four key pieces of information, listed in a very specific order: the UN/NA ID number, the proper shipping name, the hazard class, and the packing group.A great way to remember this sequence is the acronym I.S.H.P. (for Identification number, Shipping name, Hazard class, Packing group).
Question 3 Segregation Rules
You have a load containing Class 8 (Corrosives). According to the Segregation Table, which of the following materials can you absolutely NOT transport with it?
A) Class 3 (Flammable Liquids).
B) Division 4.1 (Flammable Solids).
C) Class 9 (Miscellaneous).
D) Division 2.3 (Poisonous Gas).
Correct Answer: B
Explanation: The whole point of the Segregation Table is to keep chemicals that don't play well together far, far apart. One of the biggest no-nos is mixing Class 8 Corrosives with Division 4.1 Flammable Solids.Picture this: a corrosive liquid leaks and eats through the packaging of a flammable solid. Now you have the perfect recipe for a fire. While you always have to be careful when hauling multiple hazmat classes, this combination is strictly forbidden. This kind of safety-critical knowledge is just as important as what you'd learn for the Air Brakes Test—it’s all about preventing a disaster on the road.
Finishing Up the Hazmat Endorsement Process
Passing your written hazmat test is a huge milestone, but you're not quite at the finish line. Think of it like this: you've aced the final exam for a college course, but you still have to go through the registrar's office to get the credit on your transcript. This final leg of the journey involves a few critical steps to make your endorsement official and keep it valid for the long haul.
Getting these post-test requirements right ensures all your hard work pays off. The biggest hurdle you have left is the mandatory background check from the Transportation Security Administration (TSA).
The TSA Security Threat Assessment
Before any state will stamp that "H" on your CDL, you have to pass a TSA Security Threat Assessment (STA). This isn't optional; it's a federal requirement designed to make sure that the people hauling potentially dangerous materials don't pose a security threat.
The whole thing breaks down into two parts: an online application followed by an in-person appointment to get your fingerprints taken. You'll need to hand over personal details, like your address and work history, and be upfront about any criminal record. Be completely honest—any inconsistencies could get you disqualified right away.
Pro-Tip: Start this process the moment you pass your written exam. The background check can easily take 30 to 60 days, sometimes even longer. You can't get your final endorsement until the TSA gives you the all-clear.
Passing this check means you're cleared to join a massive and absolutely essential part of the logistics world. The hazmat trucking industry is a giant, with 93,838 dedicated interstate carriers on the road at the end of 2022. That's 12.3% of all federally regulated trucking companies.
Keeping Your Endorsement Active
Earning your hazmat endorsement is the start, not the end. To keep it, you have to stay on top of ongoing training and renewals. The specifics can vary a little from state to state, but they all follow the same federal framework. It’s less of a one-time award and more like a professional subscription you need to keep current.
Here’s what you need to do to stay certified:
- Renew Your Security Threat Assessment: That TSA background check isn't a one-and-done event. You’ll have to go through the whole process again—application and fingerprints—every five years to keep your clearance.
- Keep Your CDL Up to Date: Your hazmat endorsement is part of your CDL. When it's time to renew your license, you'll likely have to retake the hazmat knowledge test to prove you're still sharp. Check with your state's DMV for their specific timeline.
- Complete Recurrent Training: Federal rules (specifically PHMSA's Subpart H) require every hazmat employee to get fresh training at least once every three years. This training makes sure you're current on general awareness, job-specific tasks, and security protocols.
These ongoing steps are there for a reason: to ensure every driver with a hazmat endorsement is a safe, knowledgeable, and trusted professional. When you understand the entire lifecycle—from studying for the test to keeping your credentials active for years—you’re setting yourself up for a long and successful career.
A Few More Common Questions About the Hazmat Endorsement
Even after you’ve got the rules and regulations down, a few practical questions almost always pop up. Let’s clear the air on some of the most common things drivers ask on their way to getting the "H" endorsement.
Think of this as tying up the loose ends. Getting straight answers to these real-world concerns will help you walk into the DMV with total confidence.
How Long Is The Hazmat Endorsement Good For?
This is a two-part answer, and it’s crucial to understand both. Your hazmat endorsement isn't a "one-and-done" deal; its validity is tied to two separate clocks.
First, there's your Commercial Driver's License. If your CDL expires, so does your endorsement. When you go to renew your license, you'll typically have to retake the hazmat knowledge test.
The second part is your TSA Security Threat Assessment (STA). This federal background check is only good for five years. You have to start the renewal process for your STA before the current one expires to keep your endorsement active. This is true even if your CDL itself isn't up for renewal yet.
What Can Disqualify You From Getting a Hazmat Endorsement?
Because you'll be hauling potentially dangerous materials, the TSA has a strict list of disqualifying criminal offenses. These rules are all about national security.
Certain serious crimes will permanently disqualify a driver, no exceptions. These include things like:
- Espionage or treason
- Murder
- Any offense related to terrorism
Then there's a list of interim disqualifying offenses. You'll be disqualified if you were convicted or found not guilty by reason of insanity for one of these crimes within the last seven years, or if you were released from prison for one of them within the last five years. This category includes serious crimes like assault with intent to murder, kidnapping, and arson.
Be 100% honest on your TSA application. Lying about or hiding a past offense is almost always seen as a bigger red flag than the offense itself and can get you disqualified immediately.
Can I Get My Hazmat Endorsement Online?
You can get started online, but you can't finish the process there. You can absolutely fill out the initial TSA Security Threat Assessment application on the web, and many approved providers offer the required Entry Level Driver Training (ELDT) theory portion online.
But a few critical steps have to be done in person. You’ll have to visit an authorized center to get your fingerprints taken for the background check. And, most importantly, the official hazmat knowledge test must be taken in person at a state DMV or licensing center. There's no getting around that.
Ready to stop studying and start driving? The road to a high-paying, secure career is closer than you think. At Patriot CDL, we provide the expert, hands-on training you need to pass your exams and get your endorsements with confidence. Don't just dream about a better future—take the wheel and drive toward it.
Visit us at https://patriotcdl.com to learn more about our accelerated programs and get started today.