


A commercial truck’s air gauges and low-air warning devices can appear normal while a physical brake component at one wheel has a serious defect. A cracked chamber, chafed hose, loose slack-adjuster part, contaminated lining, damaged drum, or missing fastener can reduce braking at that wheel and change how the vehicle responds. That is why a complete CDL inspection includes both functional brake-system checks and an axle-by-axle look at the foundation brake components.
This guide focuses on visible wheel-end hardware: chambers, hoses, pushrods, slack adjusters, drums or rotors, and friction material. It explains Pennsylvania’s CDL test standard, the federal equipment rules, and safe defect reporting without crawling beneath an unsecured vehicle or attempting repairs.
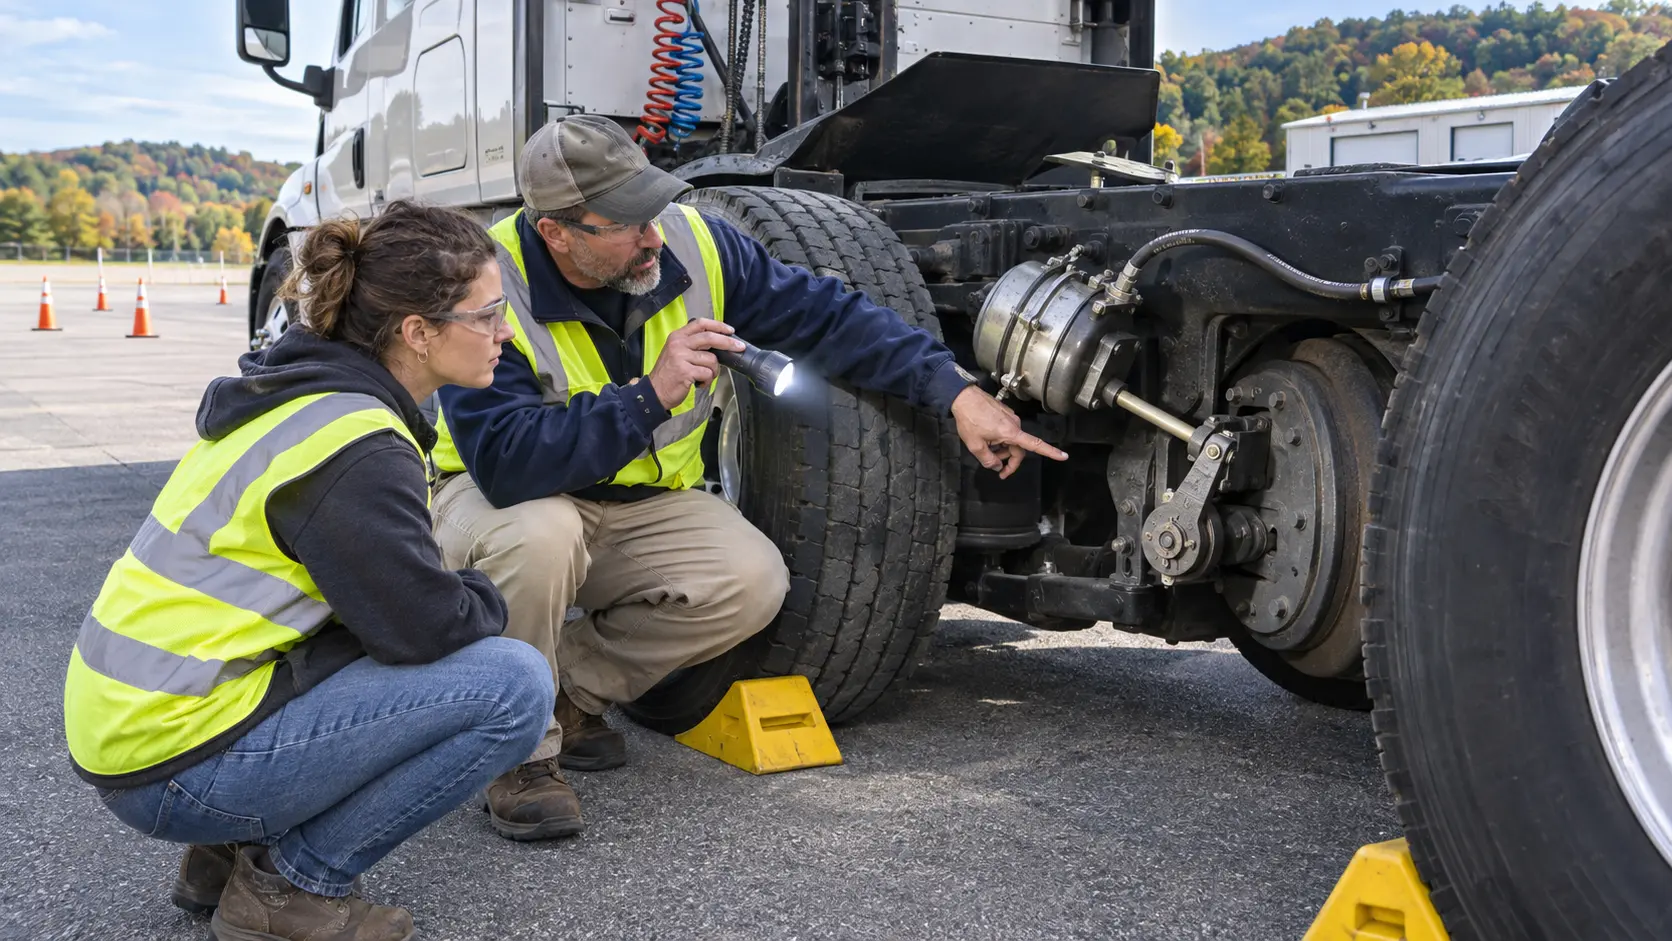
How Foundation Brakes Fit the Complete Brake System
In an air-brake vehicle, compressed air moves an actuator at the wheel end. The chamber’s pushrod transfers motion through the slack adjuster and camshaft on a typical S-cam drum brake. The cam moves the shoes and linings against the drum. Other configurations use disc brakes, hydraulic components, wedge brakes, or different actuator arrangements. The driver must inspect the components actually installed rather than narrate a memorized diagram that does not match the truck.
A functional air-system check and a physical component inspection answer different questions. The pressure-loss, warning-device, and spring-brake checks examine system behavior under specified conditions. The wheel-end inspection looks for broken, loose, missing, leaking, worn, contaminated, or damaged hardware. Passing one does not prove that the other is satisfactory.
Do not mix this routine with the air-brake test sequence
The air-brake test memory routine covers the controlled cab procedure and its order. This article stays with visible physical components. Keep the two routines connected in your overall pre-trip, but practice and explain them as distinct checks so a normal gauge reading does not cause you to skip the axle inspection.
Federal Requirements and the Pennsylvania CDL Standard
covers brake tubing, hoses, assemblies, and end fittings. It requires adequate length and flexibility for normal movement, protection against chafing, kinking, and mechanical damage, protection from exhaust or other high-temperature sources, and connections free of leaks, restrictions, or other conditions that harm brake performance.
covers brake actuators, slack adjusters, linings or pads, and drums or rotors. Among other requirements, brake components must be installed and maintained for safe, reliable stopping; chambers and slack-adjuster effective lengths on opposite ends of an axle must match as specified; lining or pad thickness must meet the applicable limits; and drums or rotors must remain above manufacturer thickness limits. Federal pushrod readjustment limits depend on the actuator type and size, so one remembered value does not fit every brake.
generally requires every installed brake to be capable of operating, subject to the section’s stated exceptions. FMCSA’s official summarizes the system: actuators, slack adjusters, linings, pads, drums, and rotors must be constructed, installed, and maintained so the vehicle can stop safely and reliably.
What PennDOT asks the CDL applicant to demonstrate
The tells applicants to look for broken, loose, or missing slack-adjuster and pushrod parts. For manual slack adjusters, it describes pulling by hand with the brakes released and checking that the pushrod does not move more than one inch. It then directs the applicant to check that chambers are not leaking, cracked, or dented and are securely mounted.
PennDOT also calls for brake hoses, lines, and couplings to be checked for cracks, wear, and leaks. Drum checks include cracks, dents, holes, loose or missing bolts, debris, oil or grease contamination, and linings that are not dangerously thin. Where an inspection opening allows the lining to be seen, the applicant should confirm a visible amount remains. The same brake-component inspection must be repeated at every axle of the power unit and trailer, if equipped.
Secure the Truck Before Inspecting Brake Components
Perform the inspection on firm, level ground in an area approved by the school or carrier. Secure the vehicle against movement, control the key, and use wheel chocks when the procedure requires them. Know whether the specific check calls for brakes applied or released before anyone approaches a pushrod or slack adjuster. Never change the brake state while another person is near a wheel end.
Use visible angles from outside the vehicle. A flashlight and inspection mirror can help, but the Pennsylvania skills-test material does not require crawling under the truck. Never place the head, arms, or body beneath a vehicle supported only by air suspension, parking brakes, hydraulic pressure, or a jack. Shop access requires approved supports and a qualified procedure.
Expect heat, stored energy, and pinch points
Brake drums, rotors, chambers, and wheel-end parts may be hot after driving. Spring-brake chambers contain powerful stored energy and are not driver-serviceable objects. Pushrods, slack adjusters, clevises, and linkages can move when pressure or brake state changes. Do not touch hot parts, open a chamber, strike a component, or place fingers between moving pieces.
Inspect Brake Chambers and Their Mounting
Locate the service chamber and, where fitted, the spring-brake section. Check the housing for visible cracks, heavy dents, corrosion perforation, or physical damage. Look at the mounting bracket and visible fasteners for looseness, missing hardware, cracking, or displacement. The chamber should not hang at an unusual angle or contact the tire, suspension, axle, frame, or another component.
Listen for an audible leak only under the operating condition specified by the approved procedure. A leak may come from a hose, fitting, chamber diaphragm area, valve, or nearby line; do not label the chamber as the source unless the evidence supports that location. Record when the sound occurs—brakes released, service brake applied, or parking brake applied—and where it is strongest.
Compare opposite ends of the axle from safe positions. An obvious difference in chamber size, component arrangement, or slack-adjuster geometry deserves a report. Never loosen a clamp band, open a spring chamber, or use a caging bolt as part of a student inspection.
Inspect Brake Hoses, Lines, and Couplings
Trace each visible brake hose or line from its connection toward the chamber or wheel-end component. It should have enough length for normal axle and suspension movement without being stretched, but it should not hang where it can rub a tire, wheel, frame edge, suspension part, or road surface. Look at support clips and routing points, not only the middle of the hose.
Look for chafing, kinks, cracks, and bulges
Inspect the outer surface for abrasion, flattened areas, sharp bends, exposed reinforcement, cracking, swelling, blistering, cuts, heat damage, or a previous unapproved repair. A bright rubbed area on an adjacent bracket can confirm contact. Do not twist the hose to expose its hidden side or apply soap solution unless the fleet procedure assigns that task.
Check connections without tightening them
Connections should appear secure and free of leakage. Look for fresh wetness in hydraulic systems, oil or debris attracted to a leak area, displaced fittings, or an audible air leak under the correct test condition. Do not tighten a fitting by feel; the correct part, orientation, seal, and torque matter. Mark the location in the report and let qualified maintenance correct it.
Inspect Pushrods, Clevises, and Slack Adjusters
Identify the chamber pushrod, clevis and pin, retaining device, slack adjuster, and connection to the camshaft on an S-cam brake. Look for broken, bent, loose, or missing parts; a missing cotter pin or retaining clip; cracked metal; an elongated connection; or a component contacting another part. The slack adjuster should not appear disconnected or positioned differently from the corresponding brake without explanation.
Understand the PennDOT manual-slack check
For a manual slack adjuster, PennDOT instructs the applicant—under the specified safe condition with brakes released—to pull the slack adjuster and confirm the pushrod does not move more than one inch. Follow the examiner’s direction and training procedure. Keep the body outside the danger area, and never have another person apply or release brakes while a hand is near the linkage.
Do not manually adjust an automatic slack adjuster
Manual adjustment can temporarily change pushrod position without correcting the cause of an automatic-adjuster problem. It can create a false impression that the brake is serviceable. A driver who finds abnormal stroke, repeated adjustment loss, damaged linkage, or an apparent automatic-adjuster problem should report it for qualified diagnosis under the manufacturer’s instructions.
Inspect Drums, Rotors, Linings, and Pads
Where visible, check a brake drum for cracks, dents, holes, loose or missing bolts, and evidence of damaging contact. A rotor or disc-brake assembly requires the checks appropriate to its design. Do not reach through openings while the vehicle could move, and never place fingers where a caliper, shoe, pad, shield, or wheel can shift.
Look for contamination and its source
Oil, grease, brake fluid, or heavy debris on a friction surface can affect braking. Inspect the area around the hub, axle seal, chamber, lines, and wheel for evidence that helps identify the path, but do not diagnose the source from color alone. The wheel and rim inspection plan explains related hub, seal, and wheel observations.
Use visible lining openings correctly
If the drum or backing plate has a designed inspection opening, use it from a safe position to confirm that lining is visible and not obviously separated, contaminated, or dangerously thin. Do not claim a measured thickness from a glance. Federal minimums vary by steering or non-steering axle and by air, hydraulic, electric, drum, or disc design.
Repeat the Routine on Every Axle
Inspecting one accessible chamber does not represent the whole combination. Repeat the component sequence—chamber, mounting, hose or line, connection, pushrod, slack adjuster or actuator linkage, drum or rotor, and visible lining or pad—at every axle of the power unit and trailer when equipped.
Use a fixed route to prevent omissions: steering axle left to right, drive axles in order, then trailer axles in order. At each axle, compare opposite ends for obvious differences in component size, mounting, routing, contamination, and position. Do not assume the far side matches the side already checked.
Foundation Brake Findings and Driver Actions
| Observation | Why it matters | Driver response |
|---|---|---|
| Chamber secure, undamaged, and no leak observed under the approved condition | Matches the visible inspection criteria | Continue the axle sequence; do not claim internal parts were inspected |
| Chamber cracked, heavily dented, loose, or audibly leaking | Actuation or secure mounting may be compromised | Secure the vehicle and report the axle, side, and test condition |
| Hose chafed, kinked, bulged, heat-damaged, or leaking | Pressure or fluid delivery can fail | Do not tape or reroute it; request qualified repair |
| Pushrod, clevis, retaining pin, or slack-adjuster part broken, loose, or missing | Brake force may not transfer correctly | Keep the vehicle stationary and document the exact part |
| Manual slack movement exceeds the PennDOT training check under the specified condition | Indicates the check is not acceptable | Report it; do not adjust the brake as a student |
| Drum cracked, holed, badly damaged, or missing visible mounting hardware | Friction surface or attachment may be unsafe | Stop and request maintenance evaluation |
| Oil, grease, or fluid visible on lining, pad, drum, or rotor | Friction and braking balance may be affected | Preserve the evidence and report the apparent source area |
| New pull, smoke, burning odor, or wheel-end heat difference after moving | May indicate uneven, dragging, or overheated braking | Make a controlled stop under carrier procedure and do not touch the brake |
Worked Scenario: A Tractor Returns After Wheel-End Service
A tractor returns from service after work at the right rear drive-axle wheel end. The repair order is closed, and the truck is assigned for a supervised lesson. The student secures the vehicle and begins the axle-by-axle routine rather than assuming the serviced brake is the only one that matters.
Step 1: Compare before touching
From a safe side view, the student compares the left and right chambers, hoses, pushrods, and slack adjusters. On the serviced side, the hose passes close to a bracket and shows a fresh shiny rub line. The support clip appears present, but the hose route differs from the opposite side. There is no audible leak under the current condition.
Step 2: Record the visible facts
The student reports: “Tractor rear drive axle, right side: brake hose has a fresh abrasion line where it passes the forward edge of the chamber bracket. Hose routing differs from the left side. No leak heard with parking brake applied. Vehicle not moved.” The student does not pull the hose away or loosen the clip.
Step 3: Let qualified maintenance decide
Maintenance confirms that the hose was routed incorrectly during the repair, corrects it according to the vehicle procedure, inspects the damaged area, and documents the work. The student then repeats the full wheel-end check, not just the hose. Chamber mounting, connection, pushrod, slack adjuster, drum area, visible lining, and clearance are all reviewed.
Step 4: Verify during the normal service-brake check
After authorized release, the instructor directs the standard low-speed service-brake check in the approved area. The truck stops without pulling or abnormal response. That functional result complements the physical reinspection; neither one substitutes for the other.
Report Brake Findings Precisely
A useful brake report includes the unit number, power unit or trailer, axle, side, component, condition, and the brake state when the symptom appeared. “Trailer front axle left chamber leaks audibly while service brake is held” is far more useful than “air leak under trailer.” For damage, include the exact rub point, crack location, missing part, or contamination path.
Do not declare that a vehicle is legally out of service unless the authorized process has made that determination. Do state clearly that the vehicle is being held pending evaluation when a safety-critical defect is found. Follow the school or carrier reporting channel and make the status visible to dispatch, instructors, maintenance, and the next driver.
Connect the inspection to the DVIR handoff
If a defect is found during or after a trip, use the required reporting process and review repair certification before the next operation when applicable. The post-trip inspection and DVIR handoff guide shows how to separate the observation, maintenance decision, certification, and next-driver verification.
Common Foundation Brake Inspection Mistakes
- Relying on the air gauges alone: system pressure does not prove every wheel-end component is secure and serviceable.
- Inspecting only one axle: PennDOT expects the brake-component routine at every equipped axle.
- Crawling under the truck: use safe sight lines and an approved support procedure when shop access is required.
- Mixing applied and released conditions: know the required brake state before approaching the linkage.
- Using one pushrod number everywhere: actuator design, size, and stroke determine federal limits.
- Adjusting an automatic slack adjuster: a manual turn can hide rather than repair the underlying condition.
- Checking only the middle of a hose: routing, clips, fittings, heat sources, and movement points matter.
- Wiping away contamination: the pattern can help maintenance identify the source.
- Touching a hot drum: use non-contact observations and follow the carrier’s overheating response.
- Writing “bad brakes”: name the axle, side, component, condition, and operating state.
Commercial-Truck Foundation Brake Checklist
Use this checklist as a study and reporting aid. The actual vehicle, current PennDOT instructions, manufacturer information, and school or carrier procedure control the inspection.
- □ Vehicle is on approved firm, level ground and secured against movement.
- □ Key and brake state are controlled; no one can move the vehicle unexpectedly.
- □ I use safe visible positions and do not crawl beneath an unsupported truck.
- □ Chamber is securely mounted and not visibly cracked, dented, or leaking.
- □ Chamber and slack-adjuster arrangement show no obvious mismatch across the axle.
- □ Hoses and lines are not cracked, worn, cut, kinked, bulged, or heat-damaged.
- □ Hoses have movement clearance and are protected from rubbing and exhaust heat.
- □ Connections appear secure and free of air or fluid leakage.
- □ Pushrod, clevis, pins, retainers, slack adjuster, and visible mounting parts are present and secure.
- □ Manual-slack movement is checked only under the PennDOT procedure and safe released-brake condition.
- □ I do not manually adjust an automatic slack adjuster.
- □ Drum or rotor area shows no visible crack, hole, severe damage, or missing hardware.
- □ Friction area shows no oil, grease, brake fluid, or heavy debris contamination.
- □ Visible lining or pad is present and not obviously separated or dangerously thin.
- □ I repeat the complete routine at every equipped power-unit and trailer axle.
- □ I note any pull, smoke, odor, abnormal heat evidence, or unusual brake response.
- □ Defects are reported by exact unit, axle, side, component, and condition.
- □ A questionable vehicle remains controlled until qualified evaluation and release.
Frequently Asked Questions
Can a CDL student manually adjust an automatic slack adjuster?
No. A student should not use manual adjustment to make an automatic slack adjuster appear acceptable. An out-of-adjustment condition can indicate an underlying component or installation problem, so the vehicle should be reported and evaluated by qualified maintenance under the manufacturer's procedure.
Does PennDOT require checking brake components on every axle?
Yes. Pennsylvania's vehicle-inspection material tells applicants to be prepared to inspect the same brake components on every axle of the power unit and trailer, when equipped. The applicant should follow the examiner's instructions and the actual vehicle configuration.
Is the one-inch pushrod check the federal limit for every air brake chamber?
No. PennDOT's skills-test material uses a one-inch hand-movement check for manual slack adjusters with the brakes released. Federal readjustment limits vary by actuator type, chamber size, and rated stroke, so do not apply one generic number to every chamber.
What should a driver do if a brake hose is chafed or leaking?
Secure the vehicle and report the exact hose location and condition. Do not tape, splice, reroute, or tighten a brake-system connection unless qualified and authorized. The carrier or qualified maintenance must evaluate and correct the defect before the vehicle is released for normal operation.
Official Sources Reviewed
Educational information only, not legal or maintenance advice. Regulations, testing procedures, component designs, and carrier policies can change. Official sources were reviewed November 3, 2026.